Usage Guide
Everything you need to run QGIS Full Motion Video — from opening a file to advanced tools.
Contents
- Requirements
- Workflow
- FMV Settings
- Video Manager
- Multiplexer
- Video Player
- Map & layers
- Video Filters
- AI Detection
- FMV Tools
- Geo-intelligence
- Draw toolbar
- Military symbols
- Keyboard shortcuts
- Troubleshooting
Requirements
| Item | Details |
|---|---|
| QGIS | 4.x (Qt6). QGIS 3 is not supported. |
| Video | MISB/STANAG 4609 with KLV, or create one via multiplexer |
| FFmpeg | Required — paths in FMV Settings |
| Python | opencv-contrib-python, matplotlib, pymisb — see code/requirements.txt |
| DEM | Optional GeoTIFF/HGT for terrain intersection |
Tip: Use the FMV Settings button (gear on toolbar) instead of editing
settings.ini.
Playback uses OpenCV (no GStreamer / LAV Filters). Live streams supported: UDP, TCP, RTP, RTSP via File → Open Stream.
Developers: run ./install_dev.sh (macOS) or install_dev.bat (Windows) to symlink the plugin and install runtime packages into QGIS bundled Python.
Workflow
flowchart TD
  A{Have MISB video?}
  A -->|Yes| B[Add to Video Manager]
  A -->|No — DJI only| C[Multiplexer → .ts]
  C --> B
  B --> D[Wait for Ready status]
  D --> E[Double-click → Player]
  E --> F[Map layers sync with video]
FMV Settings
Toolbar → FMV Settings (or Plugins → Full Motion Video → FMV Settings)
Configure in one place:
- FFmpeg / ffprobe folder
- DEM (optional elevation model)
- Reverse geocoding URL
- Layer names used when creating video groups
- Mosaic live mosaic tuning (interval, feather, max size)
- AI Detection — YOLO/ONNX models, VisDrone download, confidence, class IDs
- Dependency check — pymisb, OpenCV, FFmpeg status
- Install dependencies — guided setup when available
Changes are saved to code/settings.ini (plugin root) and applied without restarting QGIS.
AI Detection tab
FMV Settings → AI Detection
| Control | Purpose |
|---|---|
| Use YOLO/ONNX | Enable OpenCV DNN for supported filters |
| Model profile | aerial (VisDrone, FMV/UAV) · coco (ground-level) · custom |
| Download VisDrone | One-click YOLOv8n download + ONNX export to ~/.qgis-fmv-models/ |
| ONNX path | Override model file (absolute path) |
| Confidence / NMS | Detection thresholds (try 0.15 confidence for small aerial objects) |
| Per-filter class IDs | Comma-separated YOLO class indices per filter |
| Per-filter ONNX | Optional separate .onnx per filter (building, road, fire, …) |
VisDrone class IDs (default for aerial):
- Vehicle:
3,4,5,8,9(car, truck, bus, van, …) - Person:
0,1(pedestrian, people)
Building, road, fire, smoke and flood use smart CV unless you assign a custom ONNX and class IDs.
Video Manager
Central dock for your playlist.
Add media
| Action | Menu |
|---|---|
| Open file | File → Open Video File |
| Open stream | File → Open Stream |
| Create MISB | File → Create MISB File |
| Drag & drop | Drop files onto the table |
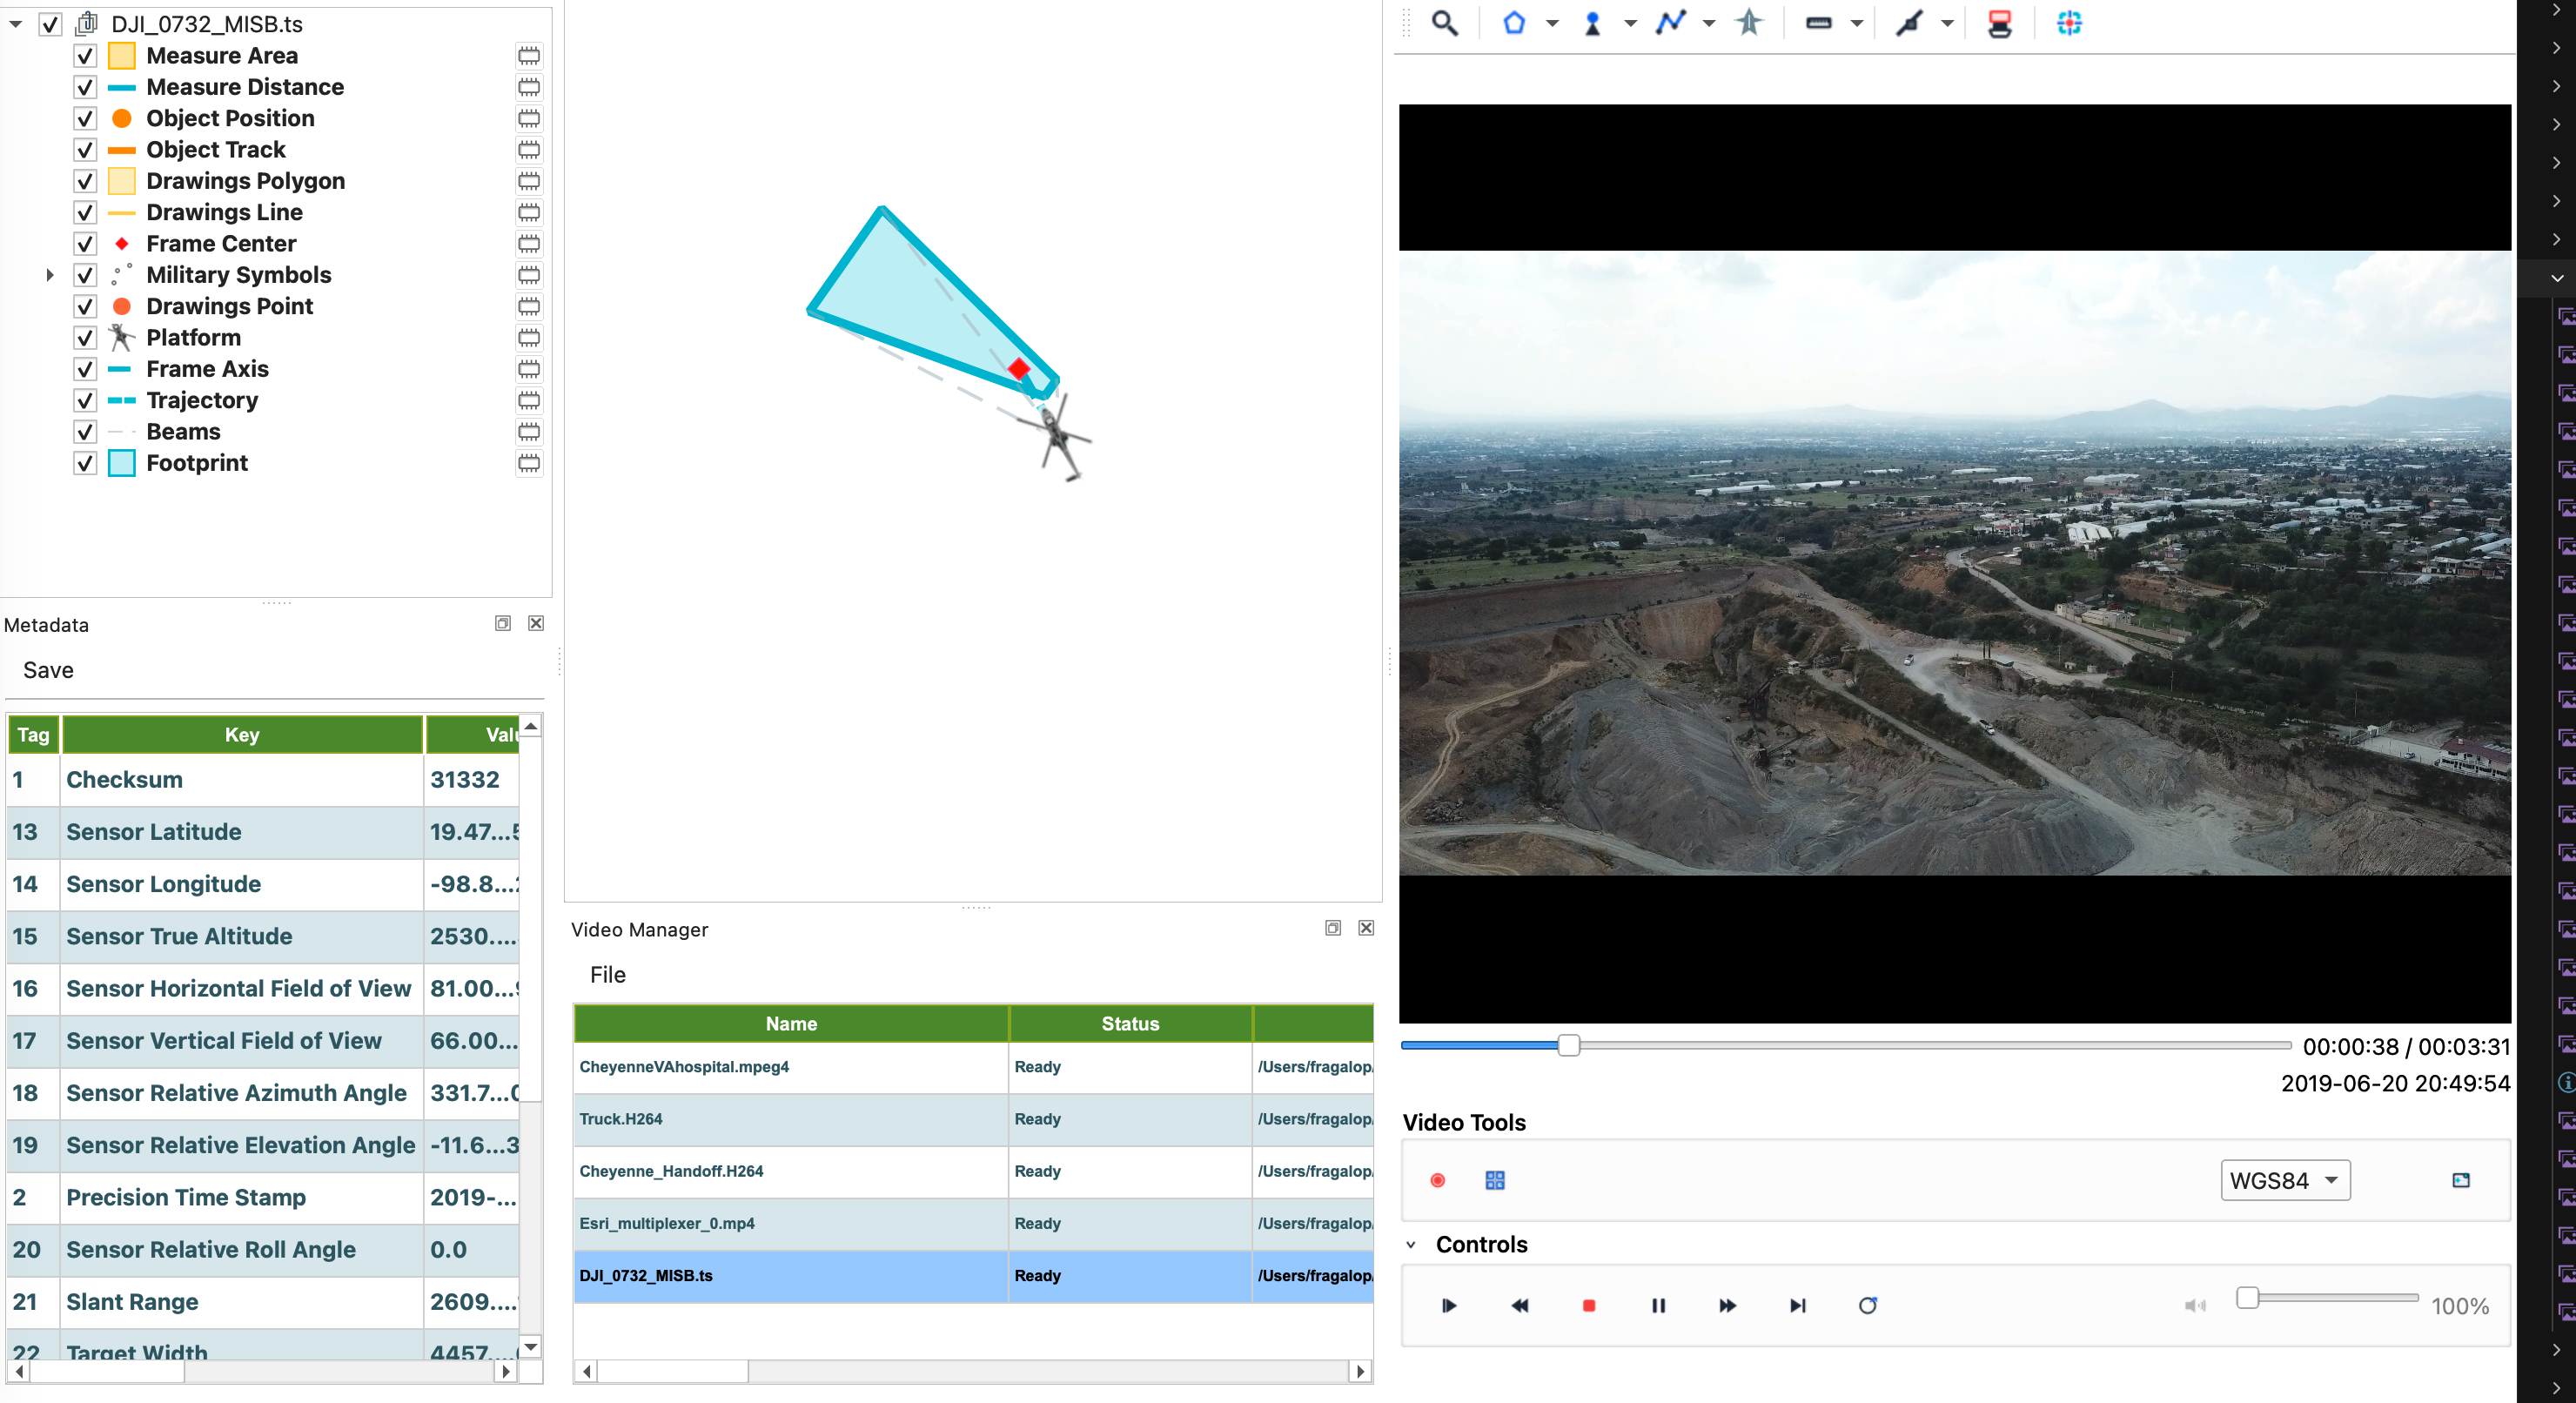
Stream example (VLC → UDP): VLC → open test video → Media → Stream → UDP → 127.0.0.1:5005. In FMV: Open Stream → UDP → port 5005 → Connect. Double-click to play.
Status column
| Status | Meaning |
|---|---|
| Indexing telemetry | Building KLV index (wait on long files) |
| Ready | Safe to play — layers will update |
Play & remove
- Double-click a row → open or switch player.
- Right-click → Remove from list.

Multiplexer
Creates MISB STANAG 4609 MPEG-TS (video + audio + timed KLV) using pymisb.
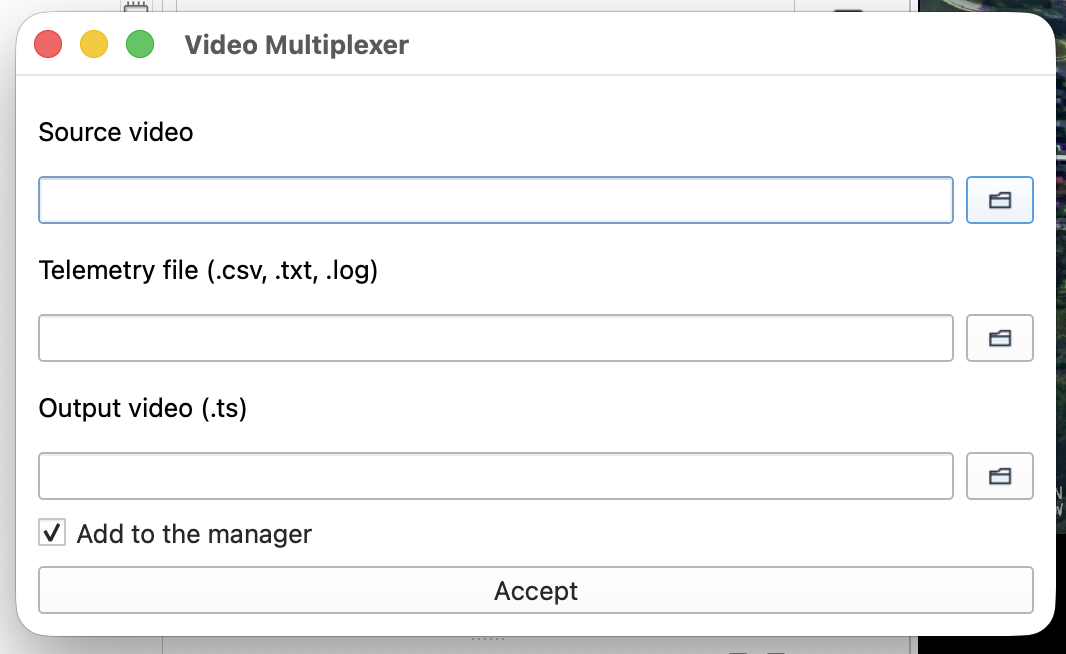
| Field | Description |
|---|---|
| Source video | Original DJI (or compatible) recording |
| Telemetry | .csv, .txt, or .log flight log |
| Output | Destination .ts path |
| Add to manager | Load result when mux finishes |
DJI telemetry sources
Flight records often live under DJI/Dji.go.v4/FlightRecords.
Convert to CSV if needed:
Steps
- File → Create MISB File
- Select video + telemetry
- Confirm output
.ts - Accept and wait for completion
Output has embedded KLV — no separate klv/ folder.
Video Player
Docked or floating window with video surface, timeline, and menus.
Playback

| Control | Action |
|---|---|
| Play / Pause | Ctrl+P |
| Stop | Ctrl+S |
| Seek | ← → or slider |
| Loop | Ctrl+L |
| Record clip | Ctrl+R |
| Volume / mute | Ctrl+U |
Video decodes with OpenCV; audio export uses FFmpeg.
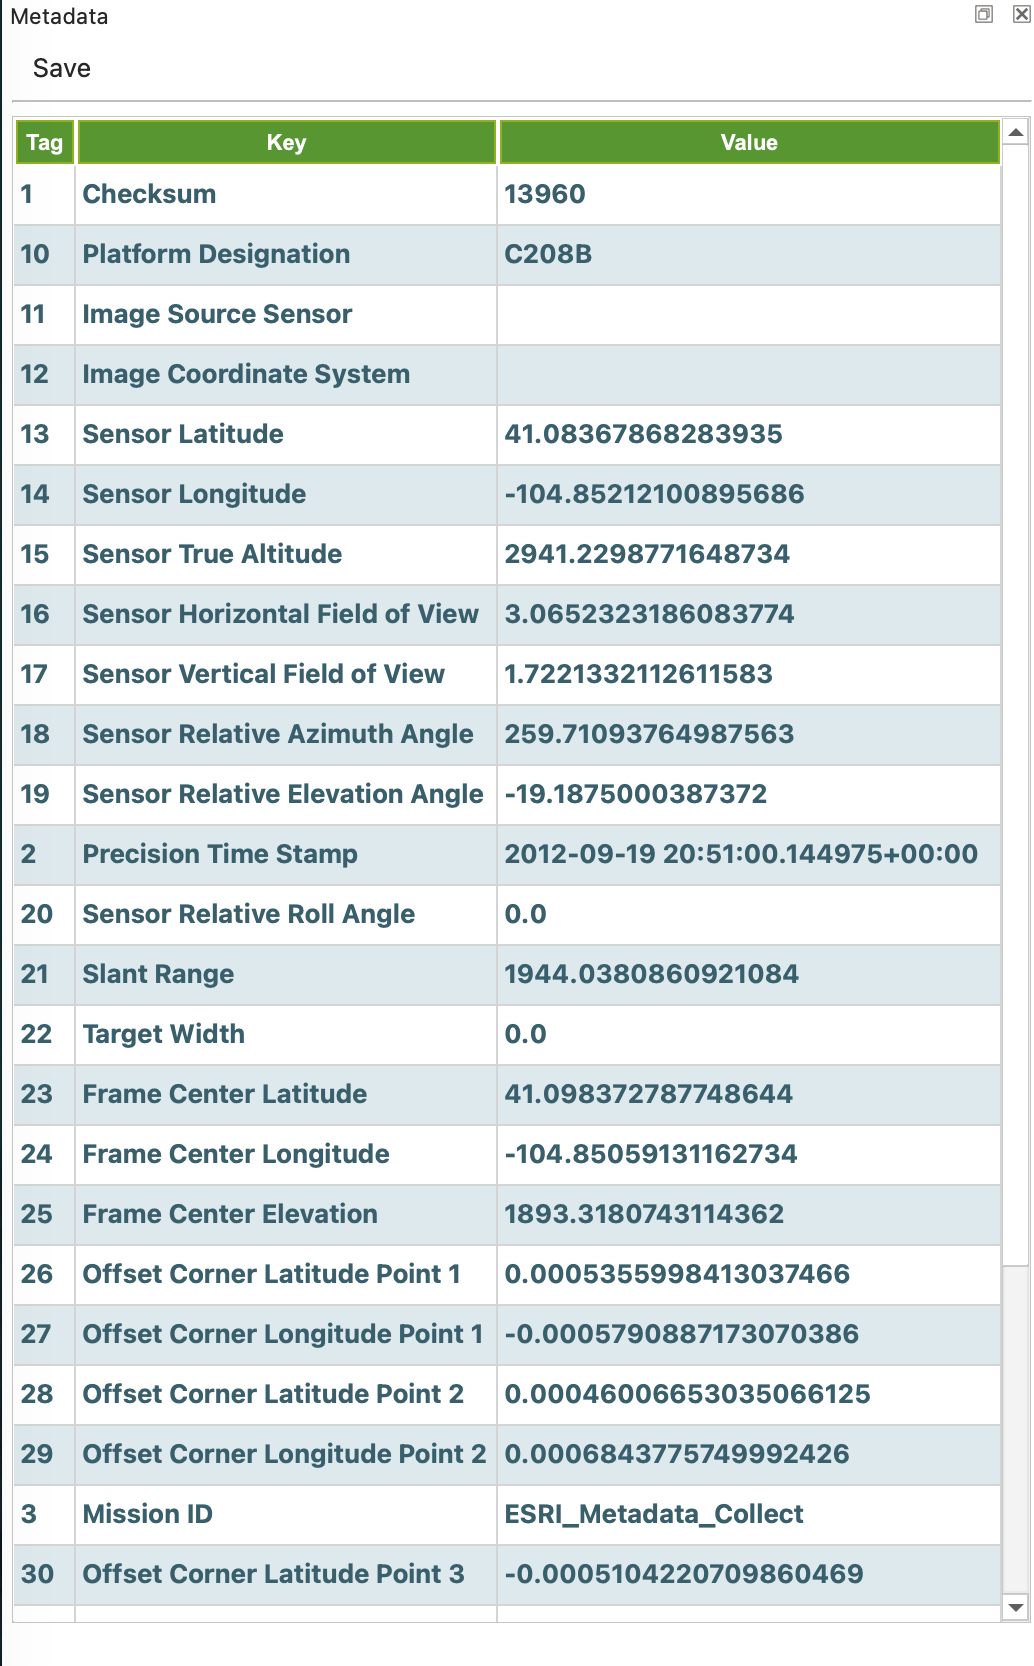
Metadata dock
Ctrl+T — MISB tags for the current frame. Export CSV or PDF.
Video menu
| Item | Description |
|---|---|
| Filters | Real-time enhancement, indices, motion — plus AI Detection submenu |
| Frames | Capture current / all / georeferenced |
| Video info | ffprobe JSON tree |
| Bitrate | Audio/video bitrate plots |
| Mosaic | Live georeferenced mosaic (Ctrl+M toolbar button) |
| Converter | Remux to another container |
Map & layers
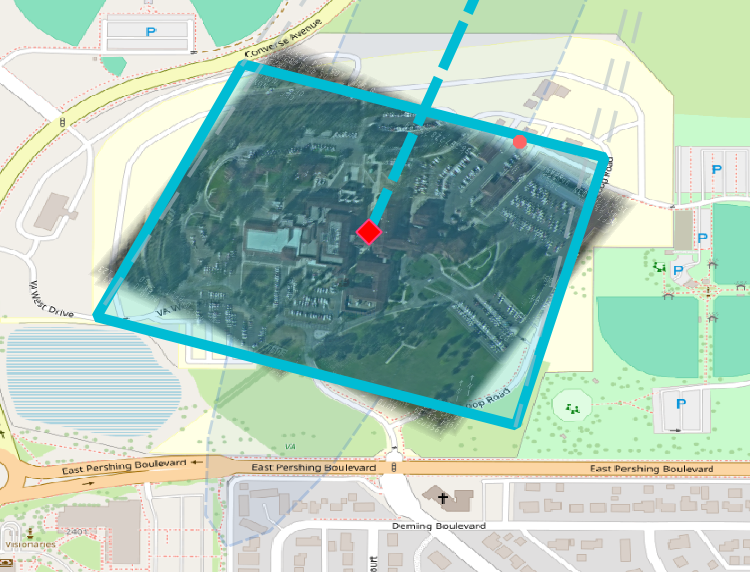
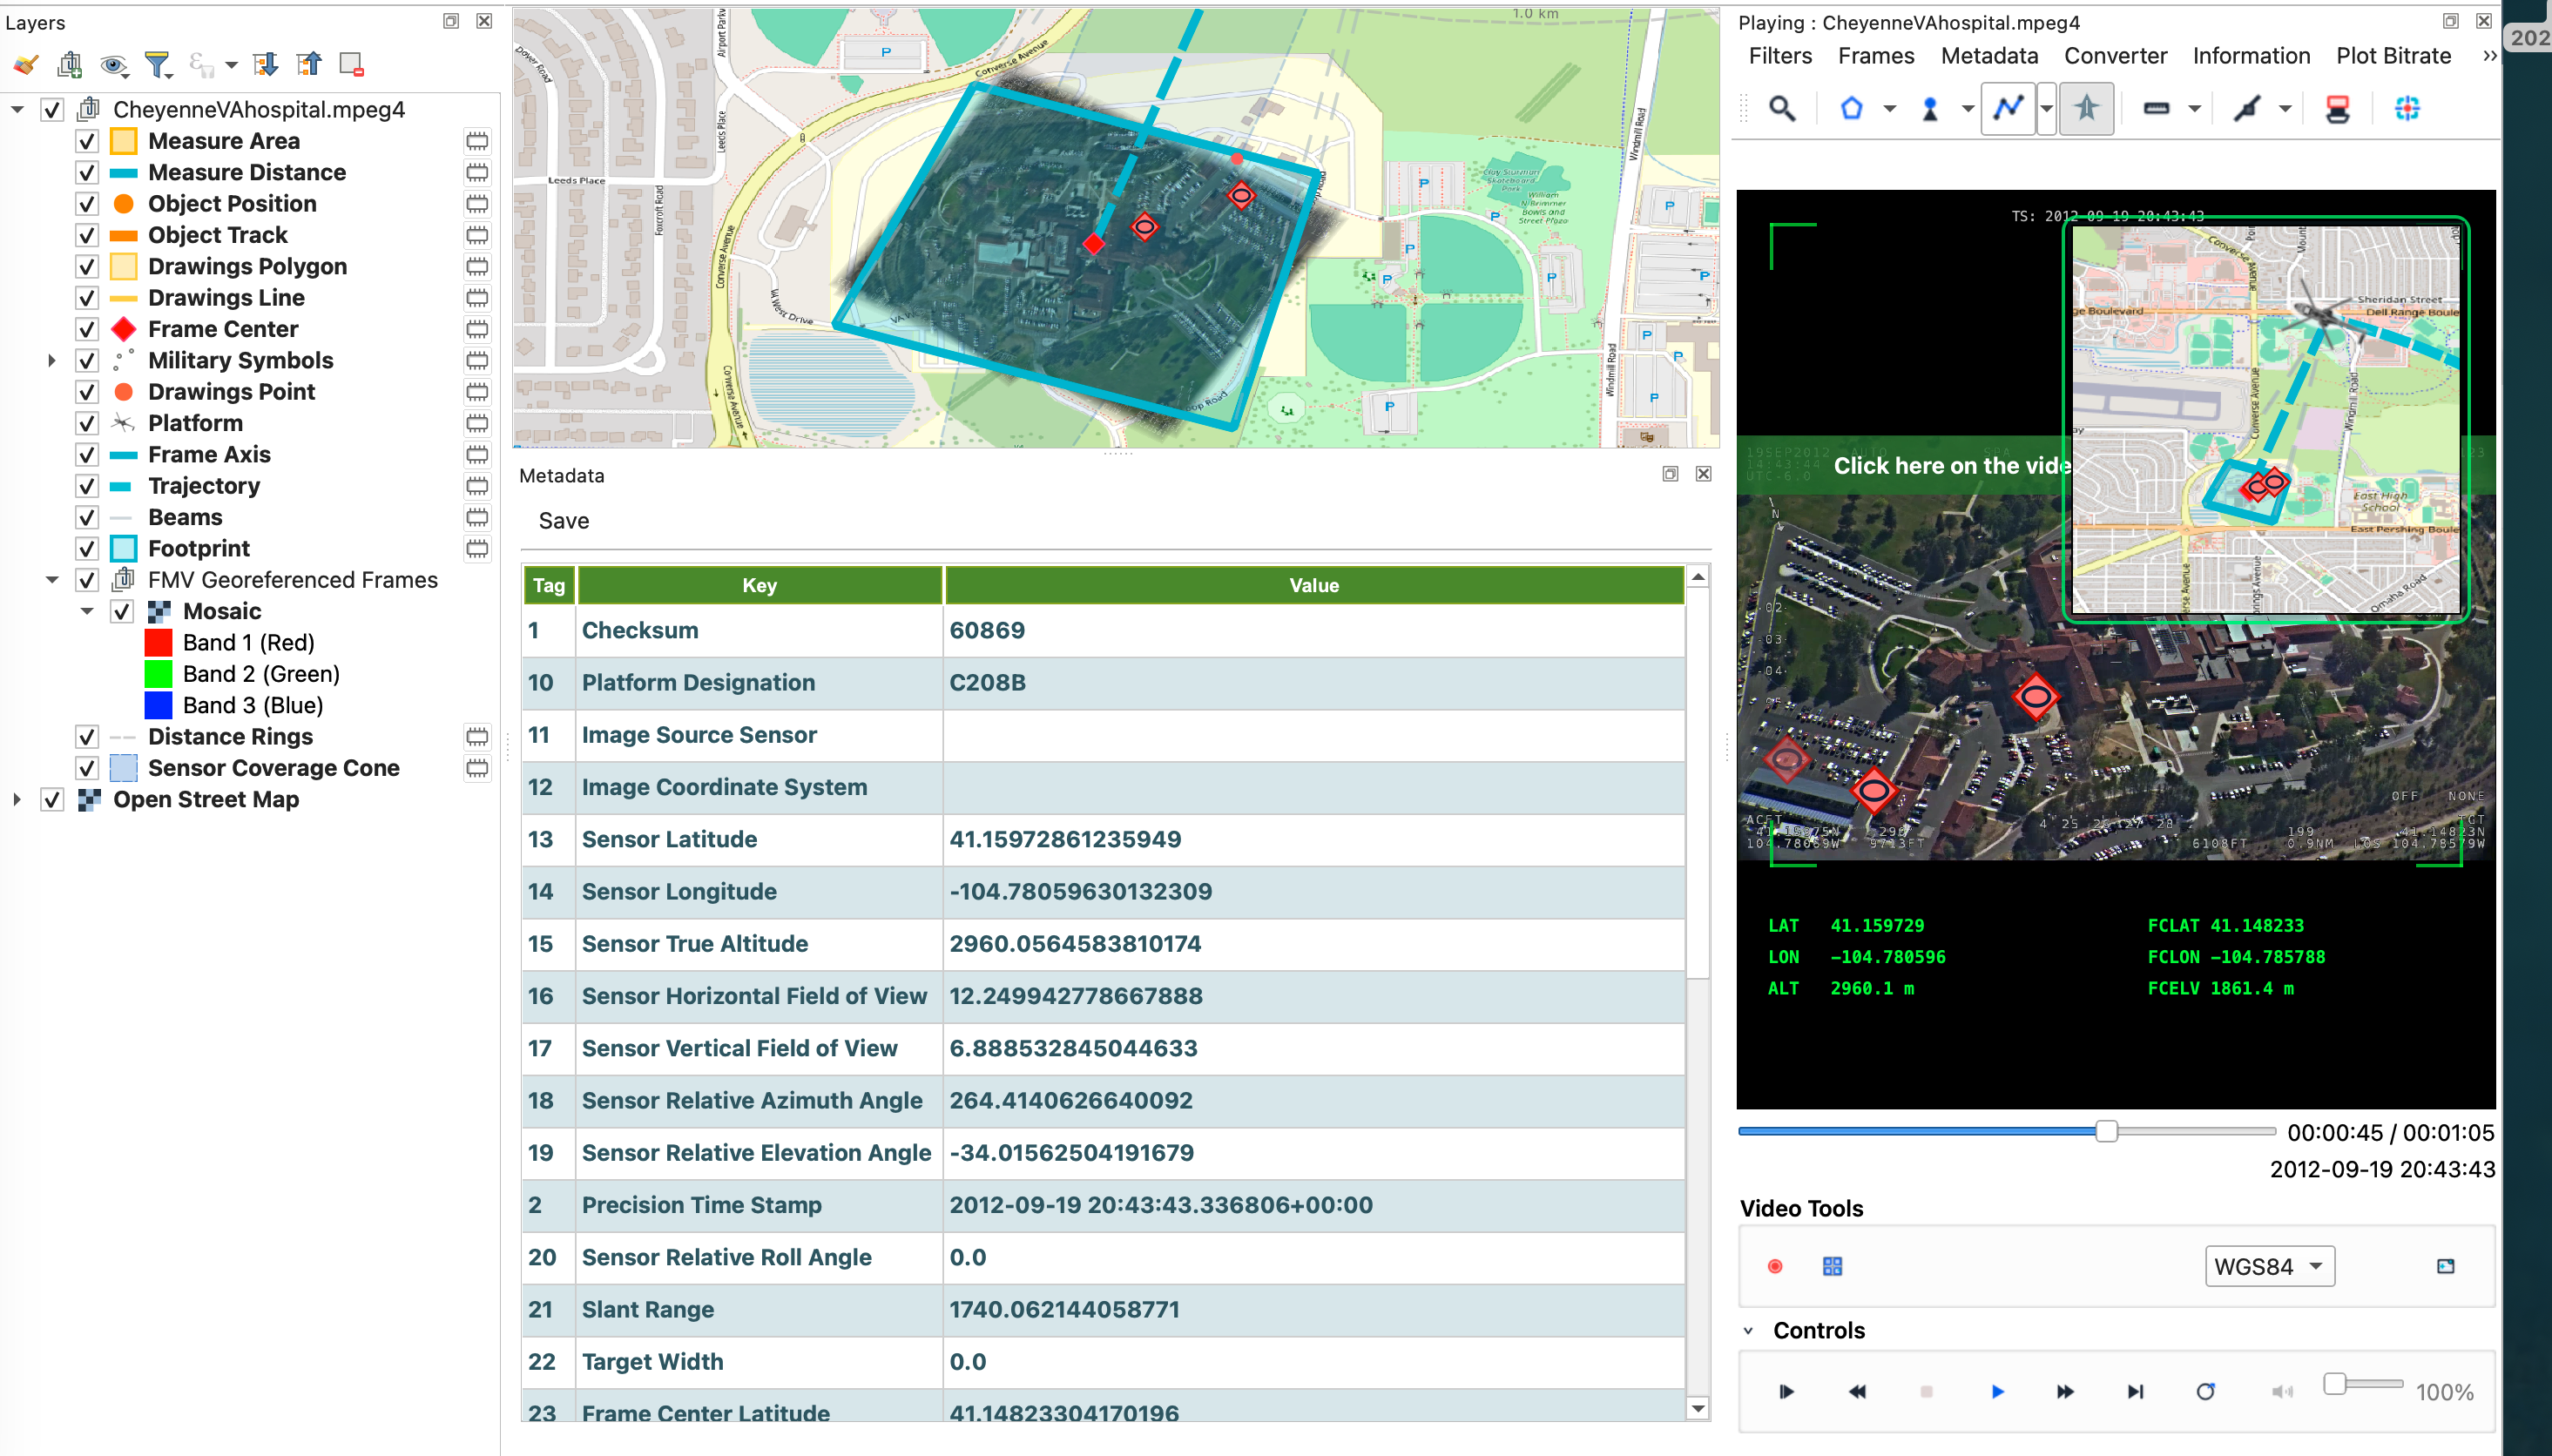
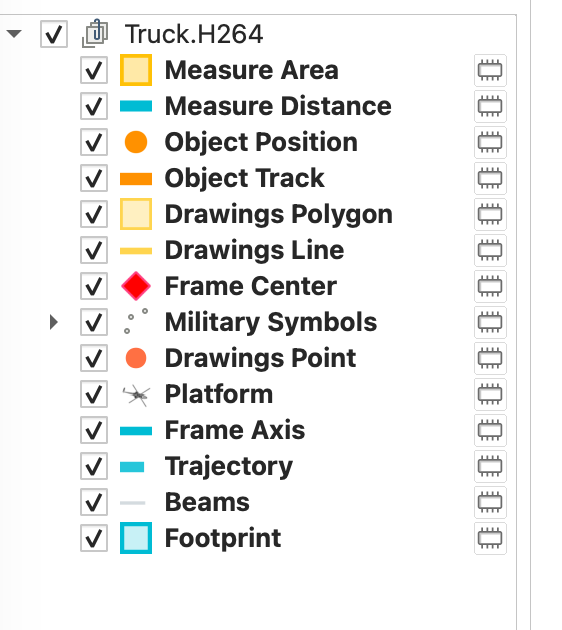
Each video gets a layer group with symbology driven by telemetry:
| Layer | Content |
|---|---|
| Platform | Sensor position + heading (pick icon in Options → Platform) |
| Footprint | Ground footprint polygon |
| Beams | Sensor corner rays |
| Trajectory | Platform path (decimated for performance) |
| Frame Center / Axis | Target geometry |
| Drawings | User sketches on video |
| Military Symbols | APP-6D inspired symbols placed on video/map |
| Sensor Coverage Cone / Distance Rings | Optional C2 overlays from FMV Tools |
Center modes
Video → Center on Platform / Footprint / Target — re-centers the QGIS map canvas on the active feature.
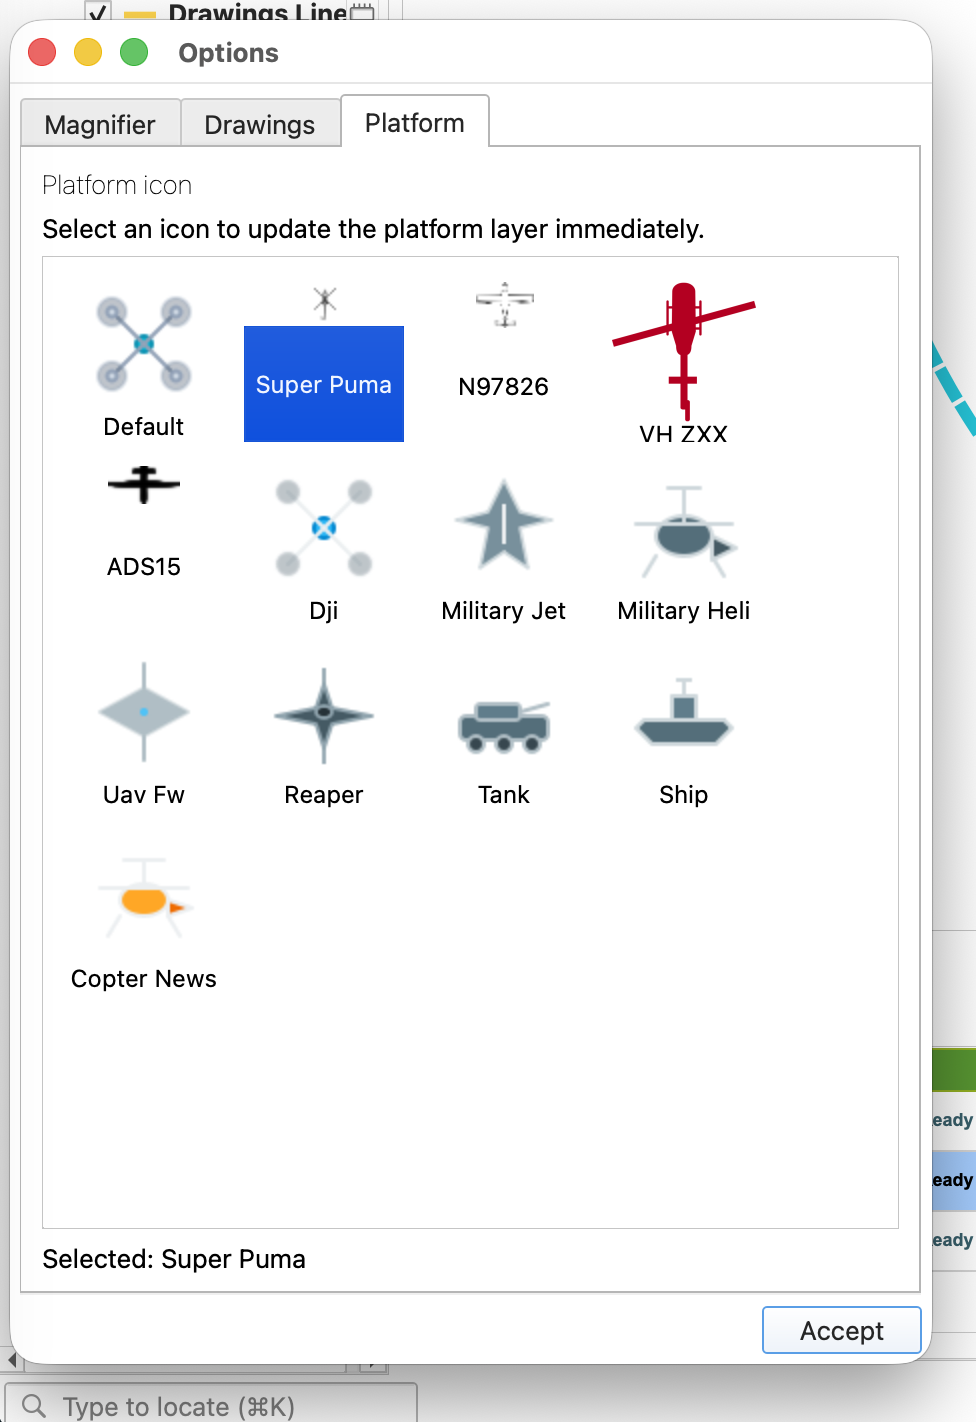
Platform icon
Options → Platform tab — thumbnail picker from military, DJI, UAV, helicopter, ship, tank presets. Updates the map layer immediately.
Video Filters
Access via Filters menu in the player. All filters work in real-time during playback.
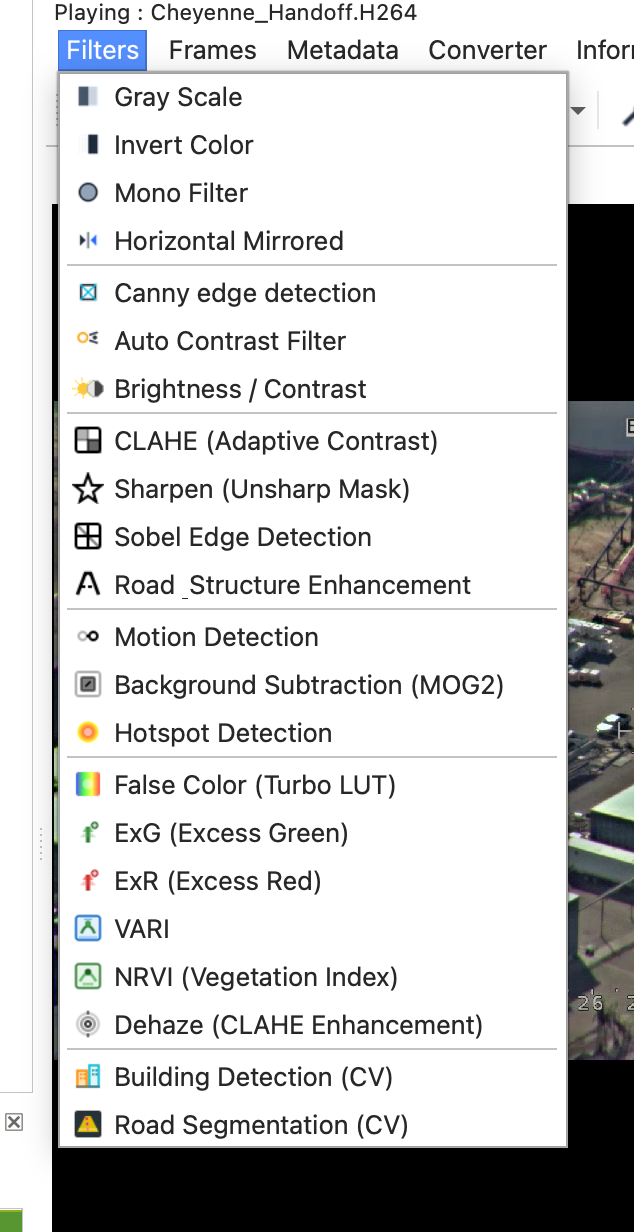
Image enhancement
| Filter | Description |
|---|---|
| CLAHE | Adaptive histogram equalization — improves contrast in shadows, fog, dark video |
| Sharpen | Unsharp mask — makes buildings, vehicles, roads more visible |
| Brightness / Contrast | Manual adjustment with slider dialog |
| Auto Contrast | Automatic CLAHE-based contrast |
| Dehaze | CLAHE + contrast stretch for foggy or low-visibility images |
| Road Enhancement | CLAHE + Sobel + Sharpen combined — highlights roads and structures |
Edge detection
| Filter | Description |
|---|---|
| Canny Edge | Classic Canny edge detection |
| Sobel | Sobel gradient magnitude — highlights structural edges, buildings, lines |
Color & vegetation
| Filter | Description |
|---|---|
| False Color (Turbo) | Rainbow LUT — makes intensity differences easy to interpret |
| Vegetation Index (ExG/VARI) | Excess Green index — NDVI equivalent for RGB cameras without NIR |
Detection & motion
| Filter | Description |
|---|---|
| Motion Detection | Frame difference — highlights moving objects with minimal cost |
| Background Subtraction (MOG2) | Adaptive background model — automatically detects moving objects |
| Hotspot Detection | Highlights brightest pixels (thermal cameras) in red overlay |
AI Detection (summary)
Segmentation filters for buildings, roads, vehicles, persons, fire, smoke and flood live under Filters → AI Detection. See AI Detection for YOLO setup, VisDrone, and [FILTERS] tuning.
Quick filters
| Filter | Description |
|---|---|
| Gray Scale | Convert to grayscale |
| Invert Colors | Invert pixel values |
| Mono | 1-bit monochrome |
| Mirror Horizontal | Flip video horizontally |
Note: Only one “slow” filter can be active at a time (CLAHE, Sharpen, Sobel, AI Detection, etc.). Quick filters (Gray, Invert, Mono, Mirror) can combine with any slow filter.
AI Detection
Designed for FMV and UAV aerial video. Open Filters → AI Detection in the player.
Available filters
| Menu item | Primary engine | Fallback |
|---|---|---|
| Vehicle (YOLO AI) | VisDrone YOLOv8n (ONNX) | Smart CV (blob + edge + motion) |
| Person (YOLO AI) | VisDrone YOLOv8n (ONNX) | Smart CV (vertical shape) |
| Building (CV + AI) | Smart CV | Optional custom YOLO ONNX |
| Road (CV + AI) | Smart CV + lane hints | Optional custom YOLO ONNX |
| Fire (CV + AI) | HSV warm-color CV | Optional custom YOLO ONNX |
| Smoke (CV + AI) | Low-saturation texture CV | Optional custom YOLO ONNX |
| Flood (CV + AI) | Blue/cyan water band CV | Optional custom YOLO ONNX |
On-screen overlay
Each AI filter draws:
- Colored tint on high-confidence regions (adaptive thresholds for aerial video)
- Bounding boxes with optional #track_id and confidence % on each box
- Status banner at the top, e.g.
VEHICLE [YOLO] det:3 12%orBUILDING [CV] det:2 8%
[YOLO] = OpenCV DNN; [CV] = classical computer vision; [SCIPY] / [NUMPY] = fallback without OpenCV.
Setup (first time)
- FMV Settings → AI Detection
- Click Download VisDrone aerial model (or point ONNX path to your own model)
- Enable Use YOLO/ONNX for segmentation filters
- Keep profile aerial for FMV/UAV footage
- Open a video → Filters → AI Detection → Vehicle (YOLO AI)
If YOLO finds nothing on a frame, the plugin automatically falls back to tuned CV when dnn_fallback_when_empty is enabled (default).
Advanced tuning (settings.ini)
Section [DNN] — model path, profile, confidence, NMS, class IDs.
Section [FILTERS] — aerial detection profile (defaults optimized for FMV):
| Key | Default | Effect |
|---|---|---|
profile |
aerial |
Enables FMV-tuned thresholds |
overlay_abs_threshold |
0.10 |
Lower = more visible tint |
detection_percentile |
70 |
CV sensitivity |
clahe_pregain |
true |
CLAHE before detection (haze) |
multiscale_detection |
true |
Fuse full-res + half-res scores |
box_nms_iou |
0.42 |
Remove duplicate CV boxes |
show_box_confidence |
true |
Labels on boxes |
tracking_enabled |
true |
Stable #id across frames |
dnn_fallback_when_empty |
true |
YOLO → CV when no DNN hits |
Template with comments: code/settings.sample.ini.
Tips for aerial FMV
- Use aerial profile, not coco, for drone footage
- Lower onnx_confidence to
0.12–0.15for very small vehicles - Vehicle/Person need VisDrone; other classes need a custom 7-class ONNX if you want true YOLO for fire/smoke/etc.
- On macOS, if OpenCV is blocked by code signing, filters still run on numpy/scipy fallbacks (slower, fewer boxes)
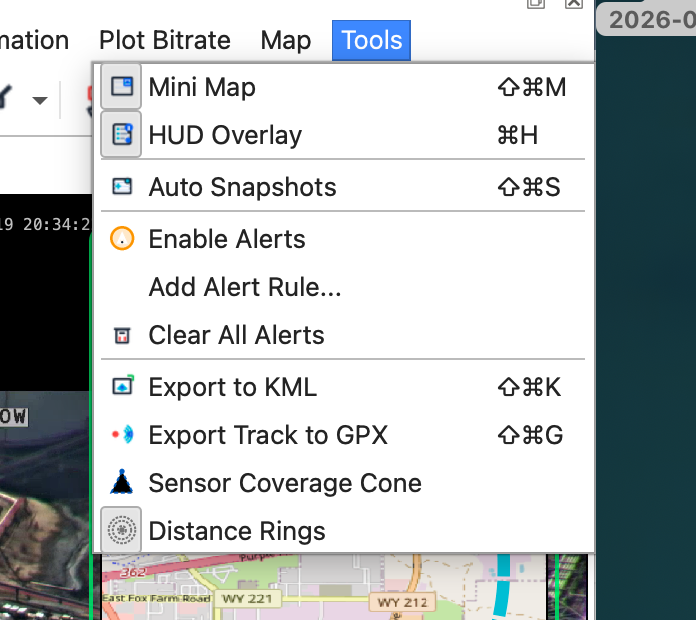
FMV Tools
Menu Tools in the player:
| Tool | Shortcut | Description |
|---|---|---|
| HUD Overlay | Ctrl+H |
Telemetry overlay on video (alert flash works even if HUD is off) |
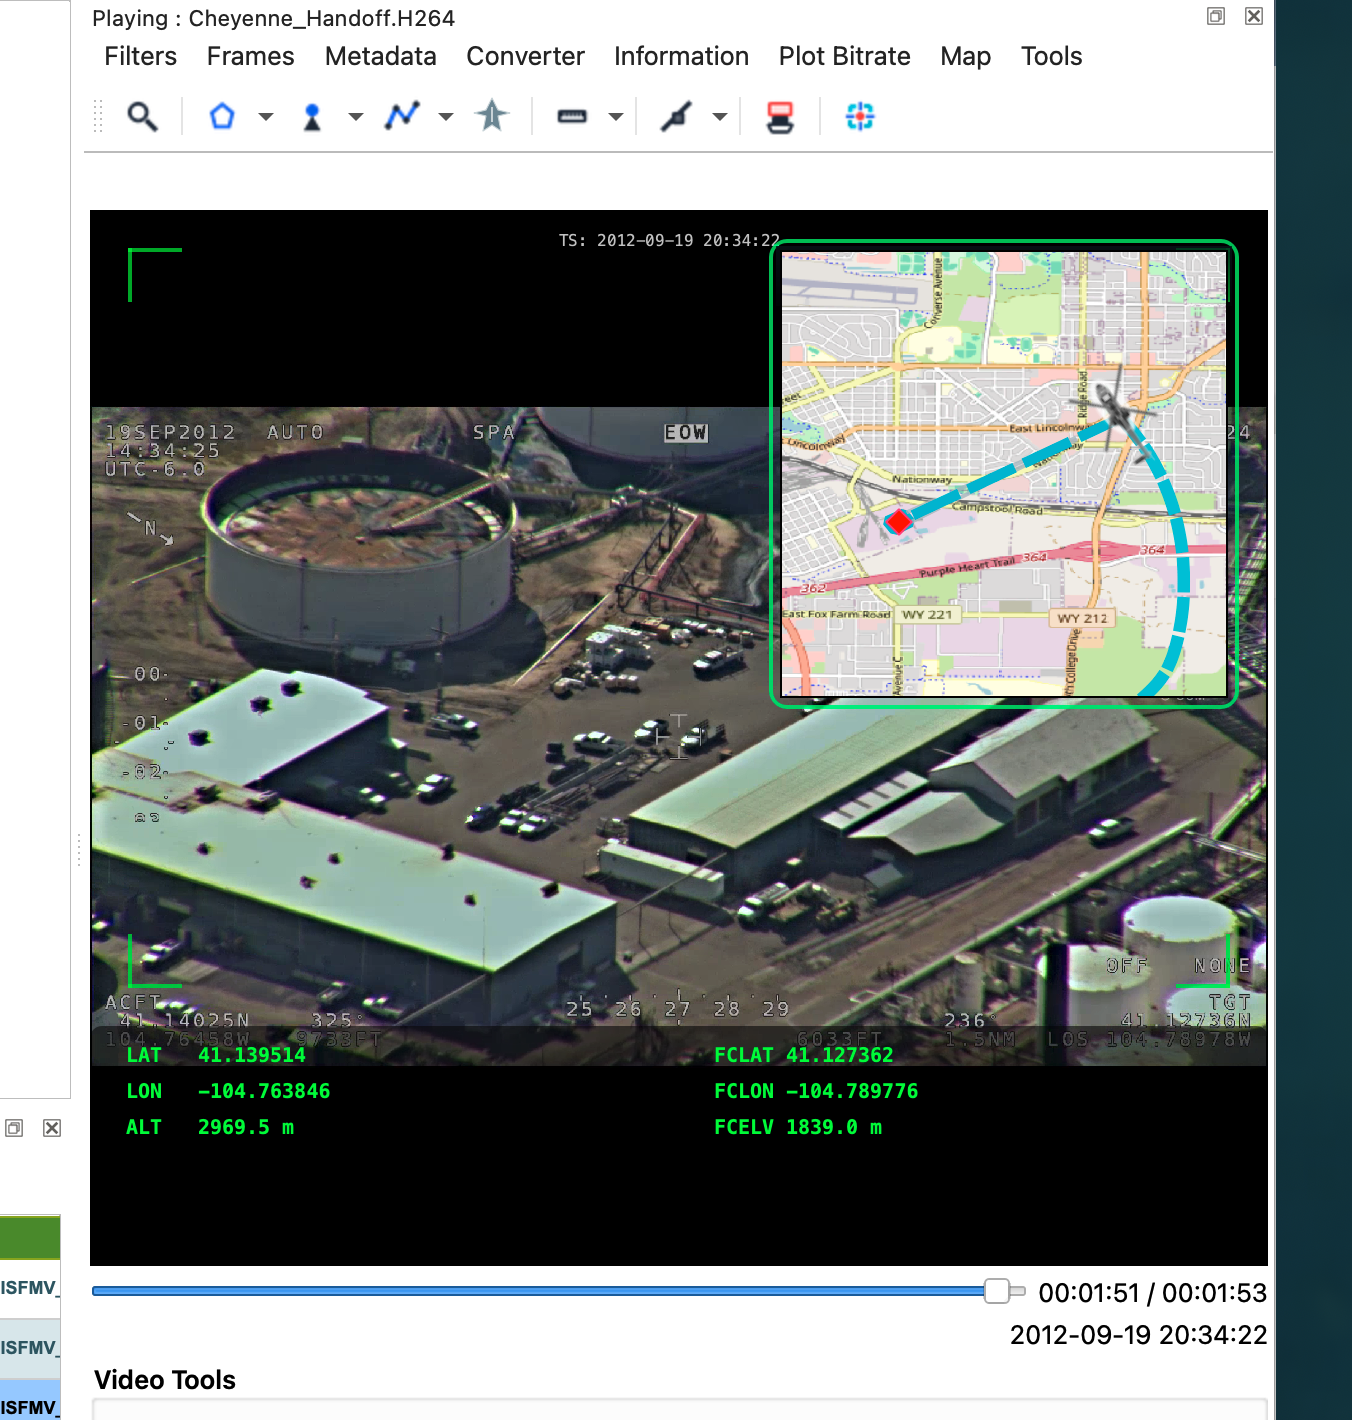
| Mini Map | Ctrl+Shift+M |
PiP map — trajectory, footprint, platform, heading |
| Auto Snapshots | Ctrl+Shift+S |
Periodic frame capture |
| Enable Alerts | — | Telemetry field rules (altitude, slant range, …) |
| Add / Clear Alert Rule | — | Numeric thresholds on MISB fields |
| Set Geofence from Footprint | — | Arm spatial AOI from current FOV |
| Clear Geofence | — | Remove AOI |
| Watch Detections in Geofence | — | Sentinel: AI hits inside AOI → alert + bookmark + HUD banner |
| Add Timeline Bookmark | B |
Marker at playhead (stores frame-center lat/lon) |
| Clear / Export Bookmarks | Ctrl+Shift+B |
CSV / KML with coordinates |
| Sensor Coverage Cone | — | C2 cone on the map |
| Distance Rings | — | Range rings around the platform |
| AI Detections on Map | — | Publish YOLO/CV boxes as georeferenced points |
| Detection Heat Trail | — | Accumulate detections over time on a trail layer |
| Live Place Labels | Ctrl+Shift+P |
Reverse-geocode frame center → HUD PLACE line |
| Instant Replay on Alert | Ctrl+Shift+R |
On alert/sentinel: rewind ~3 s and pause |
| Auto Storyboard Captures | Ctrl+Shift+Y |
Silent GeoTIFFs on bookmarks / alerts |
| Export KML / GPX | Ctrl+Shift+K / Ctrl+Shift+G |
Export trajectory / layers |
| Export Mission Package | Ctrl+Shift+E |
One ZIP: bookmarks, geotime, layers, mosaic, detections, geofence, storyboard |
Menu Map:
| Tool | Shortcut | Description |
|---|---|---|
| Center on Platform / Footprint / Target | — | Follow modes |
| Cinematic Map Follow | Ctrl+Shift+C |
Smooth (lerped) map recentering while following |
| Click Map to Seek | Ctrl+Shift+J |
Click near the track → jump video |
| Map Time Machine | Ctrl+Shift+T |
Hover along the track → scrub video + ghost FOV |
| Lookback — What did we see here? | Ctrl+Shift+L |
Click a place → every time the FOV covered it |
| Pin Target on Map | Ctrl+Shift+N |
Lock a cue point: range / bearing / next FOV |
| Jump to Next Target FOV | Ctrl+Shift+U |
Seek to the next coverage of the pin |
| Clear Target Pin | — | Remove cue marker + HUD |
Geo-intelligence
These tools turn FMV into a map ↔ video time machine. They need a video with live KLV/MISB telemetry (play a few seconds so the trajectory and footprint appear).
Spatial timeline bookmarks
- Play until telemetry is flowing.
- Press
B(or Tools → Add Timeline Bookmark). - Markers appear on the custom timeline; alerts and the Detection Sentinel also drop red markers automatically.
- Tools → Export Timeline Bookmarks… → CSV or KML with
lat/lon/alt(frame center).
KML opens in Google Earth / QGIS as real placemarks (not 0,0).
Geofence (spatial AOI)
- Play until a Footprint is drawn on the map.
- Tools → Set Geofence from Footprint — a red AOI polygon is added to the video group.
- When the frame center enters the AOI → alert message + red timeline marker + HUD flash.
- Tools → Clear Geofence removes the AOI.
AOI Detection Sentinel
Combine geofence + AI:
- Arm a geofence (above).
- Keep Tools → Watch Detections in Geofence checked (default ON).
- Keep Tools → AI Detections on Map checked.
- Enable a filter under Filters → AI Detection (e.g. Vehicle / Person).
- When a detection lands inside the AOI →
SENTINEL: 2×vehicle inside Footprint Geofence, timeline bookmark, and a red banner on the video.
Click Map to Seek
- Play with telemetry so the geo/time index builds.
- Map → Click Map to Seek (
Ctrl+Shift+J). - Click near the trajectory / flight path → video jumps to that time.
Map Time Machine (wow demo)
“Scrub the mission on the map.”
- Play the video with KLV so the plugin records (position, time, footprint) samples.
- Map → Map Time Machine (
Ctrl+Shift+T). - Move the mouse along the flight path on the QGIS canvas:
- Video seeks live to that moment
- A translucent ghost footprint shows what the sensor was looking at
- Click to lock a moment; uncheck the tool to exit.
Mutually exclusive with Click Map to Seek and Lookback.
Lookback — “What did we see here?” (analyst wow)
Reverse query: pick a building, crossroads, or AOI on the map and ask when did the sensor look at this?
- Play with KLV so footprints are recorded in the geo/time index.
- Map → Lookback — What did we see here? (
Ctrl+Shift+L). - Click a point on the map.
- A dialog lists every clustered time the footprint contained that point.
- Double-click a row (or OK) → video jumps there and the ghost FOV appears.
If no footprints were stored yet, Lookback falls back to times when the platform/frame-center was near the click (within ~80 m) and tells you to play longer for true FOV hits.
Mutually exclusive with Time Machine / Click-to-seek.
Target Pin / Cue (cross-cue wow)
Pin any ground point and treat it as a live cue:
- Play with KLV so the geo/time index (and footprints) build.
- Map → Pin Target on Map (
Ctrl+Shift+N) → click a building / crossroads / AOI. - A yellow cross appears on the map; the video shows a cue chip:
TGT 1.2 km / 045° / FOV@42.1s (+8.3s)while approachingTGT … / IN FOVwhen the footprint covers the pin
- When coverage enters, a
TARGET CUEalert fires (bookmark / Instant Replay / Storyboard if enabled). - Map → Jump to Next Target FOV (
Ctrl+Shift+U) seeks the next recorded visit. - Map → Clear Target Pin removes the cue.
Mutually exclusive (while arming) with Click-to-seek / Time Machine / Lookback.
AI Detections → Map
- Tools → AI Detections on Map must be ON (checkable).
- Enable an AI filter (Vehicle, Person, Fire, …).
- When the frame is georeferenced, box centers are projected to WGS84 and written to the AI Detections layer (track id, class, score).
Detection Heat Trail
With AI publishing ON, enable Tools → Detection Heat Trail. Points accumulate on the AI Detection Trail layer (timestamped, capped) so you can see where detections occurred over the mission — not only the latest frame.
Instant Replay on Alert
Tools → Instant Replay on Alert (Ctrl+Shift+R). When a telemetry alert, geofence enter, or Detection Sentinel fires, the player rewinds ~3 seconds and pauses (with cooldown) so you can re-watch the moment.
Live Place Labels
Tools → Live Place Labels (Ctrl+Shift+P) + HUD on (Ctrl+H). The frame center is reverse-geocoded (throttled) and shown as PLACE … on the HUD strip.
Auto Storyboard Captures
Tools → Auto Storyboard Captures (Ctrl+Shift+Y). On each bookmark and alert, a georeferenced GeoTIFF is written under <video folder>/storyboard/ (included in the mission package when present).
Cinematic Map Follow
Map → Cinematic Map Follow (Ctrl+Shift+C) while a center-on mode is active. The canvas eases toward the target instead of jumping each telemetry tick.
Mission package
Tools → Export Mission Package… (Ctrl+Shift+E) builds a ZIP with whatever is available:
| File | Content |
|---|---|
MANIFEST.txt |
Inventory |
bookmarks.csv / .kml |
Timeline markers + coordinates |
geotime_index.csv |
Samples used by seek / Time Machine |
ai_detections.csv |
Last AI points snapshot |
layers.kml |
Telemetry / drawings (best-effort) |
mosaic.tif |
Live mosaic if built |
geofence.csv |
Armed AOI ring |
storyboard/ |
Auto GeoTIFF captures (if any) |
Ideal for after-action briefings.
Demo script (2 minutes)
1. Open MISB video → play until footprint + trajectory visible
2. Tools → Set Geofence from Footprint
3. Tools → AI Detections on Map + Heat Trail (ON) + Filters → Vehicle
4. Tools → Instant Replay + Storyboard + Place Labels (ON); HUD on
5. Map → Cinematic Follow + Map Time Machine → scrub along the track
6. Map → Pin Target on a building → watch TGT cue / Jump to Next FOV
7. Map → Lookback → click a building → jump through every revisit
8. When a vehicle enters the AOI → Sentinel flash + rewind + storyboard frame
9. Tools → Export Mission Package → open ZIP / KML / storyboard in QGIS
Draw toolbar
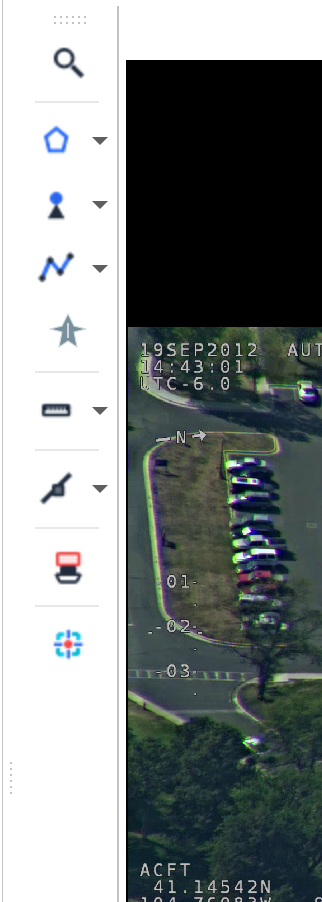
The draw toolbar is movable and floatable — drag it to any edge of the player window, or float it outside. Its position and visibility persist across sessions.
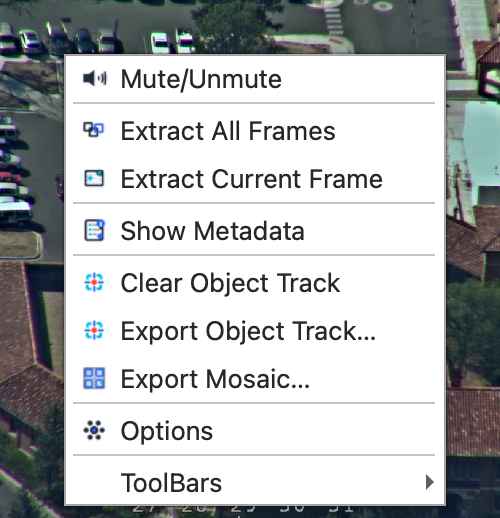
Show / hide the toolbar
- Right-click on the video → ToolBars → check/uncheck Utils ToolBar
- Right-click on the menu bar → ToolBars → same option

Tools
| Tool | Use | Remove |
|---|---|---|
| Magnifier | ROI zoom (cached) | — |
| Point | Place numbered pins on video | Remove last / Remove all (dropdown) |
| Polyline | Draw lines on video | Remove last segment / Remove last / Remove all (dropdown) |
| Polygon | Draw polygons on video | Remove last / Remove all (dropdown) |
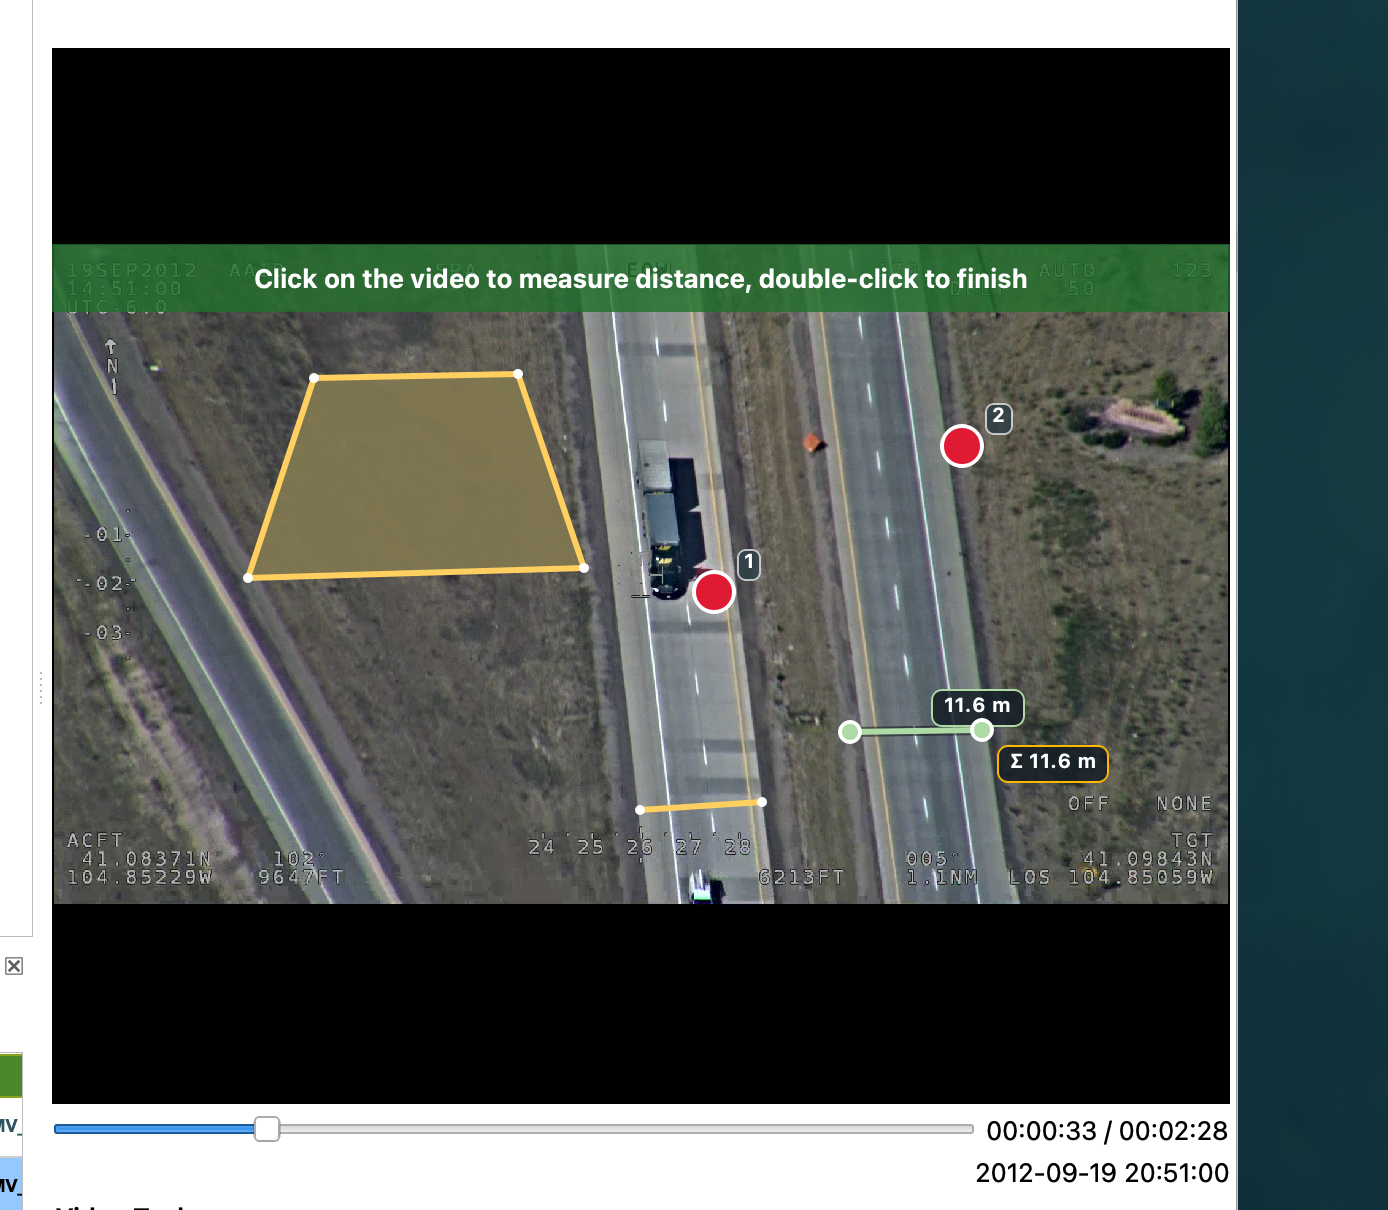
| Measure Distance | Click points to measure distance | Remove last / Remove all (dropdown) |
| Measure Area | Click points to measure area | Remove last / Remove all (dropdown) |
| Hand draw | Freehand line | — |
| Censor | Black out regions | Remove last / Remove all (dropdown) |
| Stamp | e.g. Confidential overlay | — |
| Object tracking | OpenCV MOSSE tracker | — |
| Military Symbols | Place NATO APP-6D symbols | Remove last / Remove all (dropdown) |
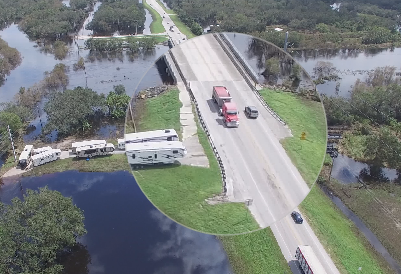
Tool placement hints
When you activate a drawing or measurement tool, a flashing green banner appears on the video telling you how to use it (e.g. “Click here to place a point”, “Double-click to finish line”). The hint disappears after a few seconds or when you deactivate the tool.
Options
Right-click the draw toolbar for options: magnifier size, colors, line styles.
Military symbols
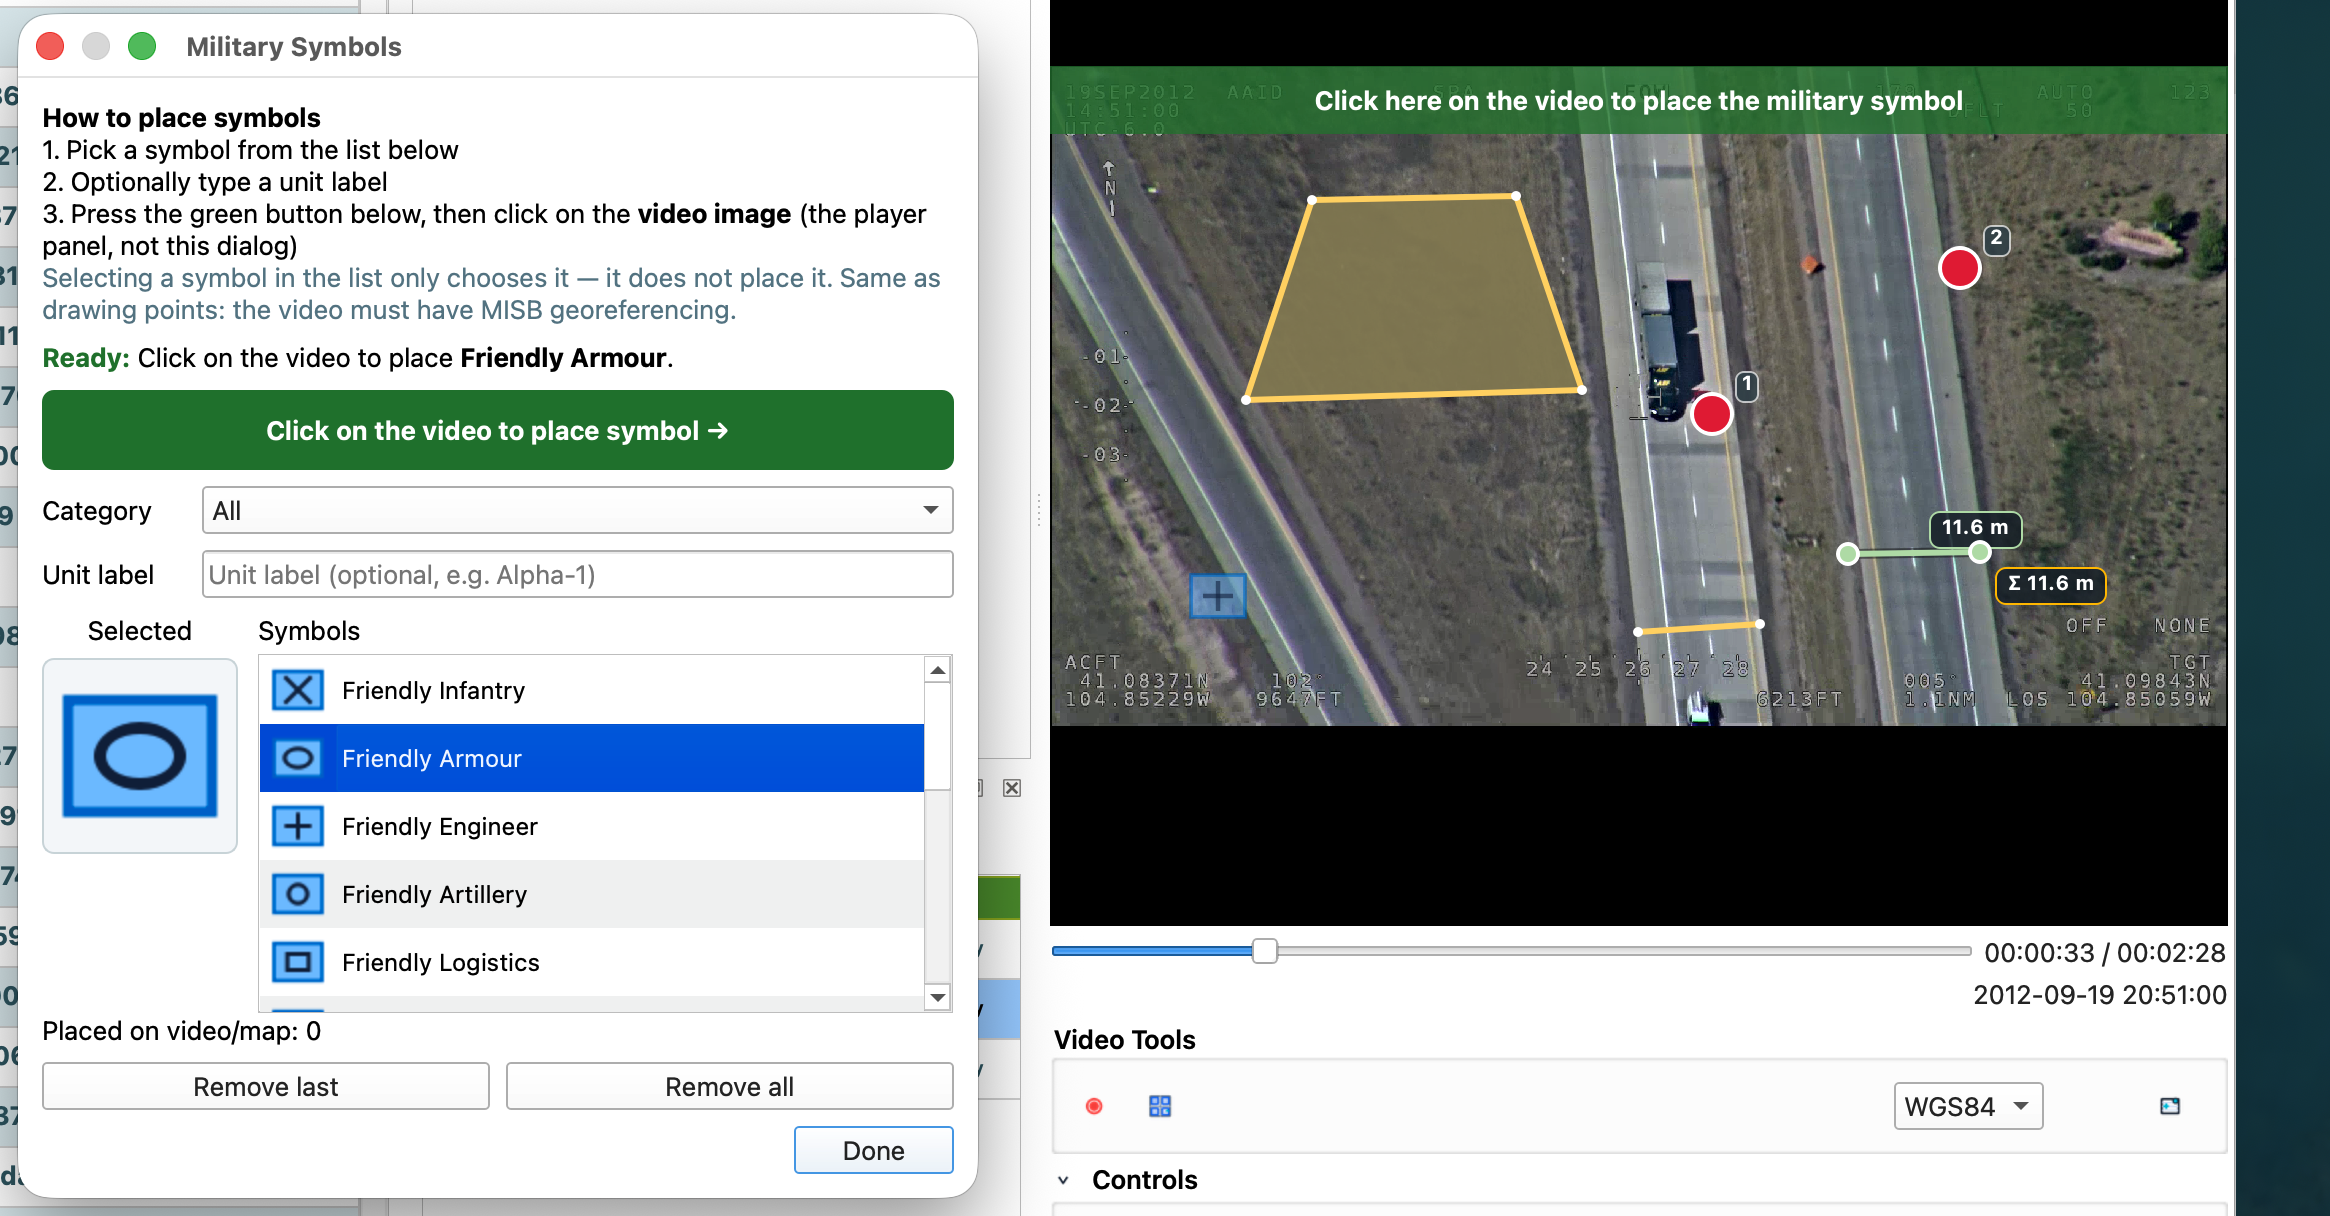
Place NATO APP-6D inspired symbols on the georeferenced video and map.
Draw toolbar → Military Symbols (or the toolbar action in the player).
Steps
- Open the Military Symbols dialog.
- Pick a category (Friendly, Hostile, Neutral, Special) and symbol from the list.
- Optionally enter a unit label (e.g. Alpha-1).
- A placement hint banner appears on the video.
- Click on the video image (not the dialog) at the target location.
- Symbol appears on video and in the Military Symbols map layer.
Manage placements
| Action | Where |
|---|---|
| Remove last | Dialog button or draw toolbar dropdown |
| Remove all | Dialog button or draw toolbar dropdown |
| Undo last on map | Same as remove last |
Symbols require valid georeferencing (GCP / MISB metadata). SVG assets live in code/images/military/.
Keyboard shortcuts
Global
| Shortcut | Action |
|---|---|
Alt+F |
Open / focus FMV |
Alt+A |
About |
Player — transport
| Shortcut | Action |
|---|---|
Ctrl+P |
Play / pause |
Ctrl+S |
Stop |
Ctrl+L |
Loop |
Ctrl+R |
Record clip |
Ctrl+U |
Mute |
← / → |
Step frame |
Ctrl+← / Ctrl+→ |
Jump start / end |
Player — data & export
| Shortcut | Action |
|---|---|
Ctrl+T |
Metadata dock |
Ctrl+Q |
Capture frame |
Ctrl+A |
Extract all frames |
Ctrl+Shift+C |
Save metadata CSV |
Ctrl+Shift+P |
Save metadata PDF |
Player — FMV Tools & geo-intelligence
| Shortcut | Action |
|---|---|
Ctrl+H |
HUD overlay |
Ctrl+Shift+M |
Mini map |
Ctrl+Shift+S |
Auto snapshots |
B |
Add timeline bookmark |
Ctrl+Shift+B |
Export bookmarks |
Ctrl+Shift+J |
Click map to seek |
Ctrl+Shift+T |
Map Time Machine |
Ctrl+Shift+L |
Lookback (what did we see here?) |
Ctrl+Shift+N |
Pin Target on Map |
Ctrl+Shift+U |
Jump to Next Target FOV |
Ctrl+Shift+K |
Export KML |
Ctrl+Shift+G |
Export GPX |
Ctrl+Shift+E |
Export mission package |
Ctrl+Shift+P |
Metadata PDF (metadata dock) |
Troubleshooting
Map stays empty while video plays
- Confirm MISB/KLV data stream exists (multiplexed
.ts). - Wait until manager shows Ready.
- Check layers are visible in the project tree under the video group.
Trajectory connects loop start/end on repeat
- Fixed in recent builds — update plugin. Each loop should start a new segment.
Multiplexer fails
- Verify FFmpeg path in FMV Settings.
- Check telemetry format (CSV columns or DJI
.txt/.log). - Ensure output folder is writable.
Missing OpenCV / pymisb
End users: open FMV Settings → Install dependencies or check the dependency status panel.
Developers:
./install_dev.sh                              # macOS — symlink + requirements
bash scripts/install_plugin_requirements.sh   # deps only
Use the same Python as QGIS — do not pip install --user OpenCV on macOS (breaks signed QGIS). The FMV Settings dependency check shows which interpreter is in use.
Black screen on Windows
Install OpenCV via requirements. Set FFmpeg path. Try Video → Converter to remux unusual containers.
Military symbol does not appear on map
- Video must be georeferenced (MISB metadata or valid GCP).
- Click on the video surface, not the symbol dialog.
- Check the Military Symbols layer is visible under the video group.
AI Detection shows det:0 0% or [CV] only
- Open FMV Settings → AI Detection: profile must be aerial for FMV/UAV (not coco).
- Click Download VisDrone or set ONNX path to a valid
.onnxfile and enable Use YOLO/ONNX. - Vehicle/Person use VisDrone; if YOLO returns no boxes, CV fallback runs automatically.
- Tune
[FILTERS]insettings.ini— loweroverlay_abs_thresholdordetection_percentilefor more sensitivity. - Ensure OpenCV works (FMV Settings dependency panel). Without OpenCV, only numpy/scipy CV runs.
Filters don’t show visible change
- Ensure OpenCV is installed (
pip install opencv-contrib-python). - Some filters (Motion Detection, Background Subtraction) need video playback to show results.
- Check the Filters menu — only one “slow” filter can be active at a time.
QGIS FMV · README