# Usage Guide
Everything you need to run **QGIS Full Motion Video** — from opening a file to advanced tools.
README ·
Contributing
---
## Contents
1. [Requirements](#requirements)
2. [Workflow](#workflow)
3. [FMV Settings](#fmv-settings)
4. [Video Manager](#video-manager)
5. [Multiplexer](#multiplexer)
6. [Video Player](#video-player)
7. [Map & layers](#map--layers)
8. [Video Filters](#video-filters)
9. [AI Detection](#ai-detection)
10. [FMV Tools](#fmv-tools)
11. [Geo-intelligence](#geo-intelligence)
12. [Draw toolbar](#draw-toolbar)
13. [Military symbols](#military-symbols)
14. [Keyboard shortcuts](#keyboard-shortcuts)
15. [Troubleshooting](#troubleshooting)
---
## Requirements
| Item | Details |
|------|---------|
| **QGIS** | **4.x** (Qt6). QGIS 3 is not supported. |
| **Video** | MISB/STANAG 4609 with KLV, or create one via multiplexer |
| **FFmpeg** | Required — paths in **FMV Settings** |
| **Python** | `opencv-contrib-python`, `matplotlib`, `pymisb` — see `code/requirements.txt` |
| **DEM** | Optional GeoTIFF/HGT for terrain intersection |
> **Tip:** Use the **FMV Settings** button (gear on toolbar) instead of editing `settings.ini`.
**Playback** uses OpenCV (no GStreamer / LAV Filters). **Live streams** supported: UDP, TCP, RTP, RTSP via **File → Open Stream**.
**Developers:** run `./install_dev.sh` (macOS) or `install_dev.bat` (Windows) to symlink the plugin and install runtime packages into QGIS bundled Python.
---
## Workflow
```mermaid
flowchart TD
A{Have MISB video?}
A -->|Yes| B[Add to Video Manager]
A -->|No — DJI only| C[Multiplexer → .ts]
C --> B
B --> D[Wait for Ready status]
D --> E[Double-click → Player]
E --> F[Map layers sync with video]
```
---
## FMV Settings
**Toolbar → FMV Settings** (or **Plugins → Full Motion Video → FMV Settings**)
Configure in one place:
- **FFmpeg / ffprobe** folder
- **DEM** (optional elevation model)
- **Reverse geocoding** URL
- **Layer names** used when creating video groups
- **Mosaic** live mosaic tuning (interval, feather, max size)
- **AI Detection** — YOLO/ONNX models, VisDrone download, confidence, class IDs
- **Dependency check** — pymisb, OpenCV, FFmpeg status
- **Install dependencies** — guided setup when available
Changes are saved to **`code/settings.ini`** (plugin root) and applied without restarting QGIS.
### AI Detection tab
**FMV Settings → AI Detection**
| Control | Purpose |
|---------|---------|
| **Use YOLO/ONNX** | Enable OpenCV DNN for supported filters |
| **Model profile** | **aerial** (VisDrone, FMV/UAV) · **coco** (ground-level) · **custom** |
| **Download VisDrone** | One-click YOLOv8n download + ONNX export to `~/.qgis-fmv-models/` |
| **ONNX path** | Override model file (absolute path) |
| **Confidence / NMS** | Detection thresholds (try **0.15** confidence for small aerial objects) |
| **Per-filter class IDs** | Comma-separated YOLO class indices per filter |
| **Per-filter ONNX** | Optional separate `.onnx` per filter (building, road, fire, …) |
**VisDrone class IDs (default for aerial):**
- Vehicle: `3,4,5,8,9` (car, truck, bus, van, …)
- Person: `0,1` (pedestrian, people)
Building, road, fire, smoke and flood use **smart CV** unless you assign a custom ONNX and class IDs.
---
## Video Manager
Central dock for your playlist.
### Add media
| Action | Menu |
|--------|------|
| Open file | **File → Open Video File** |
| Open stream | **File → Open Stream** |
| Create MISB | **File → Create MISB File** |
| Drag & drop | Drop files onto the table |
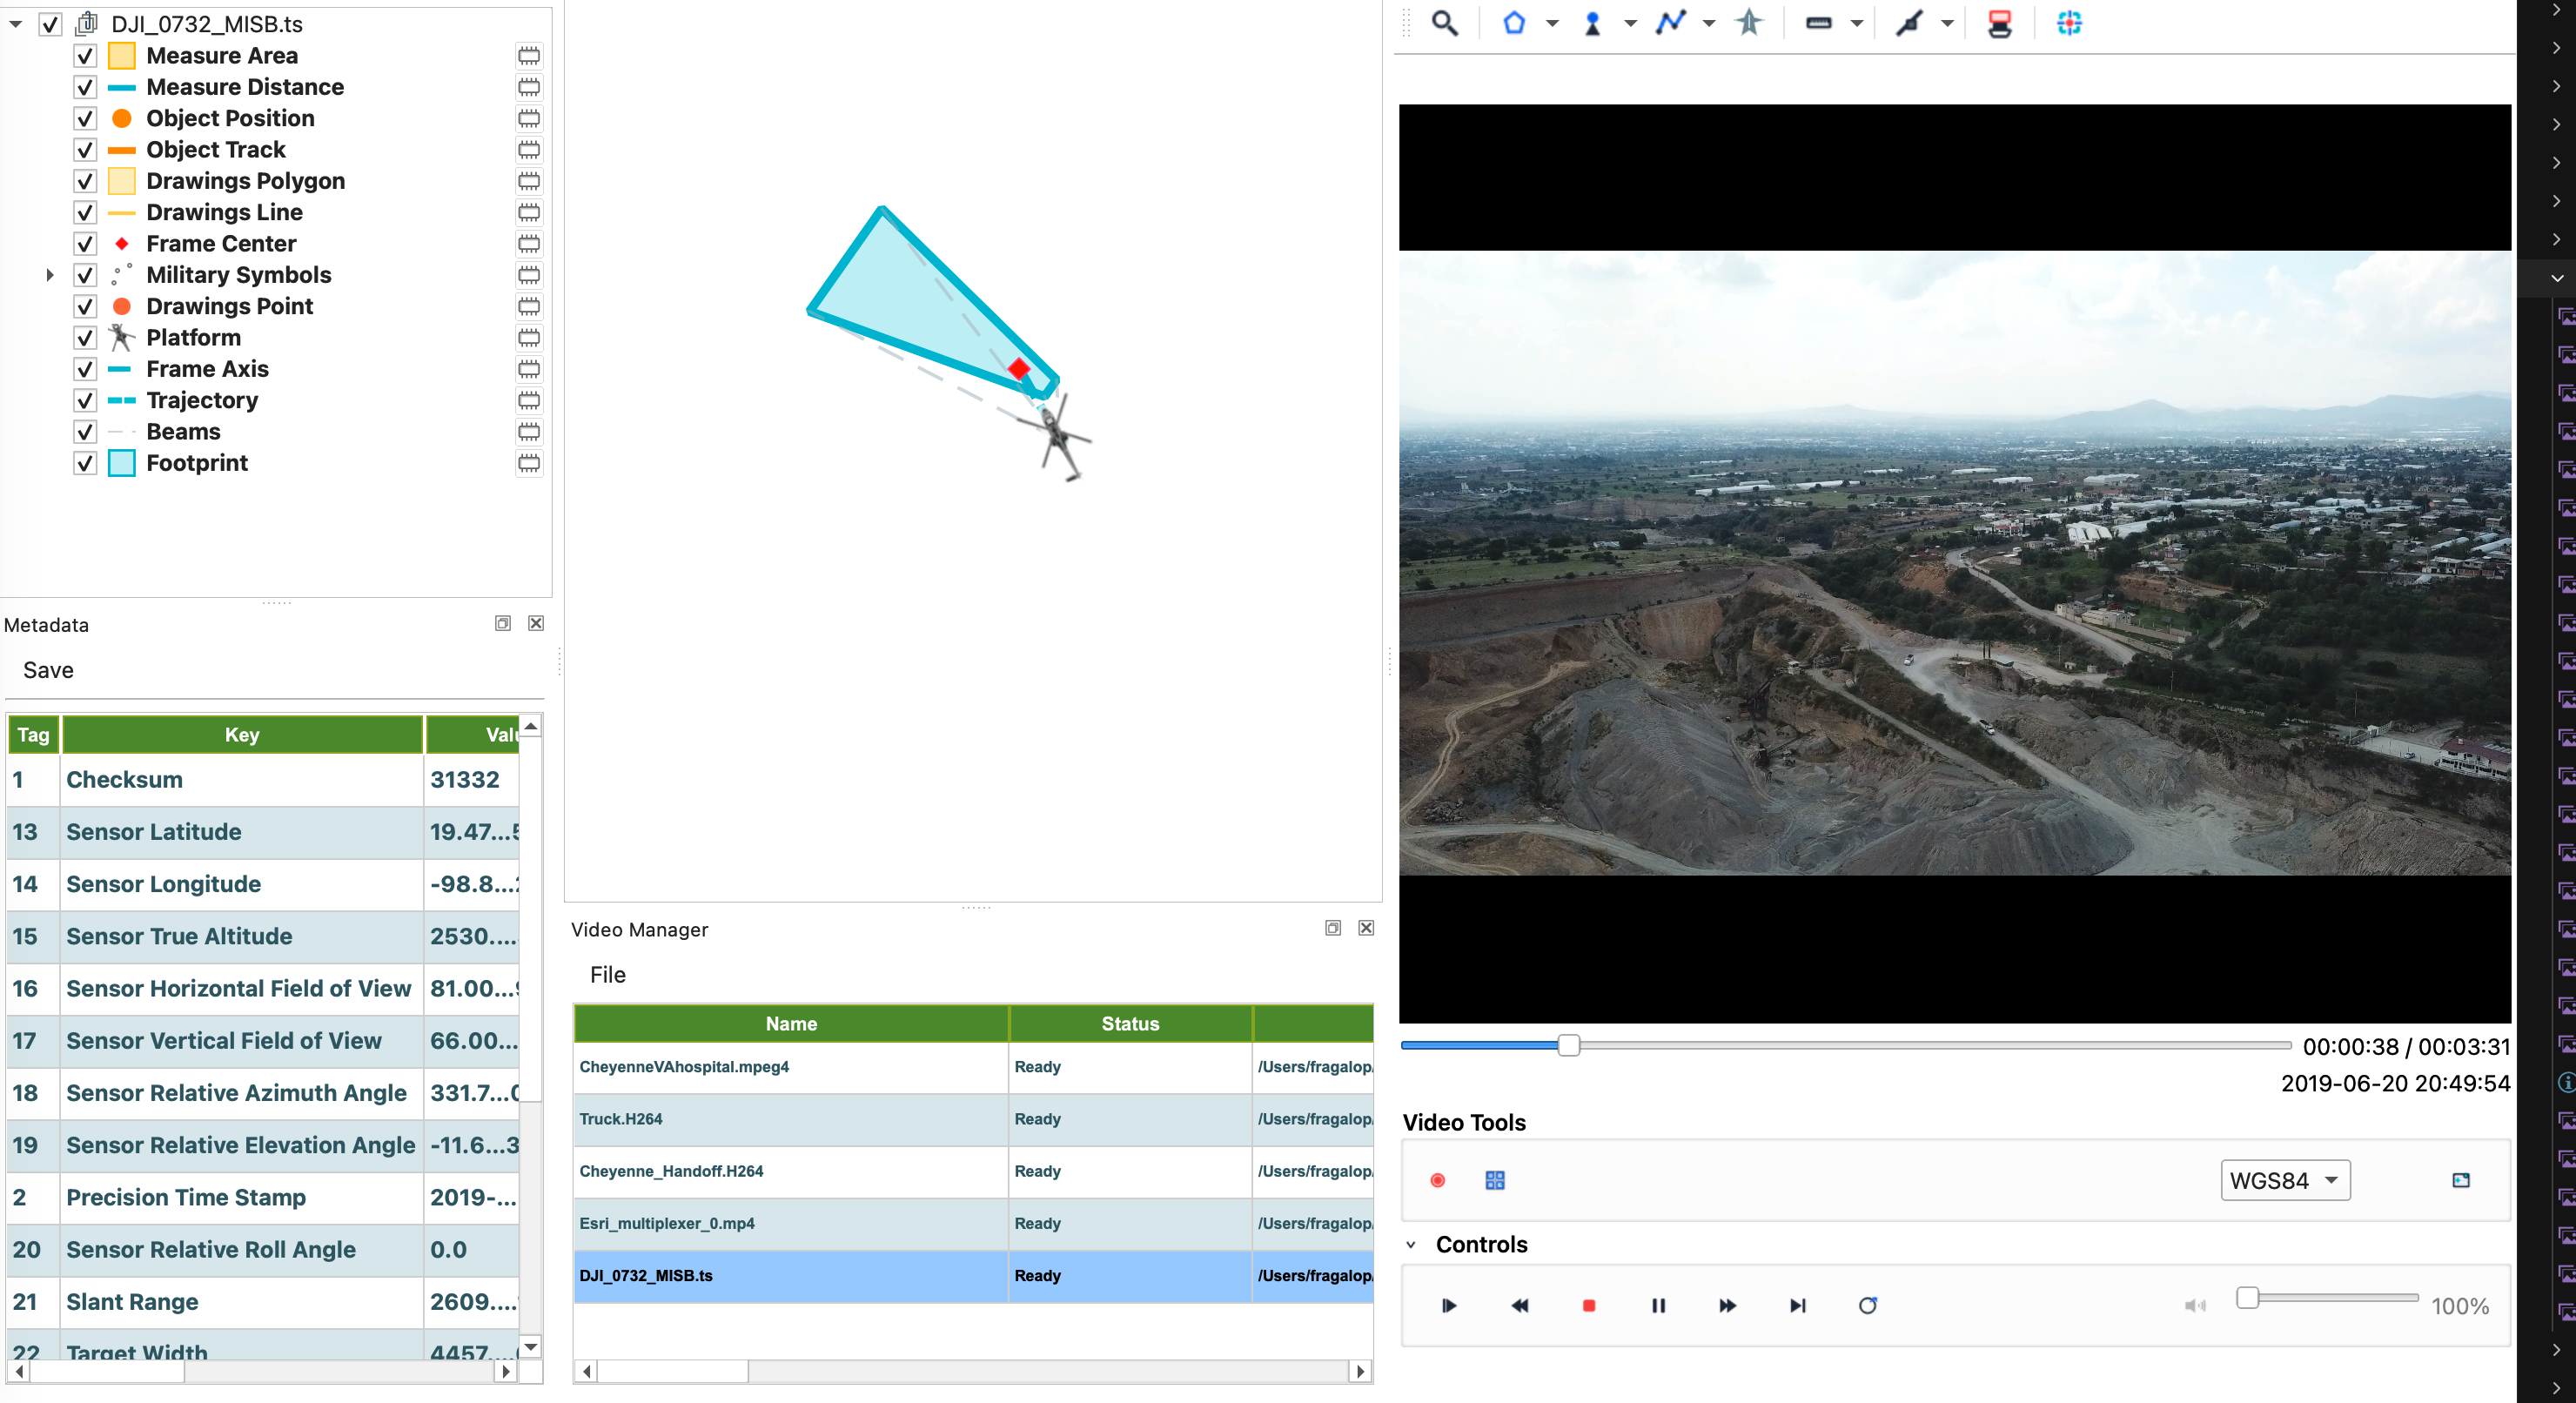
**Stream example (VLC → UDP):** VLC → open test video → **Media → Stream** → UDP → `127.0.0.1:5005`. In FMV: **Open Stream** → UDP → port `5005` → **Connect**. Double-click to play.
### Status column
| Status | Meaning |
|--------|---------|
| Indexing telemetry | Building KLV index (wait on long files) |
| Ready | Safe to play — layers will update |
### Play & remove
- **Double-click** a row → open or switch player.
- Right-click → **Remove from list**.

---
## Multiplexer
Creates **MISB STANAG 4609** MPEG-TS (video + audio + timed KLV) using **pymisb**.
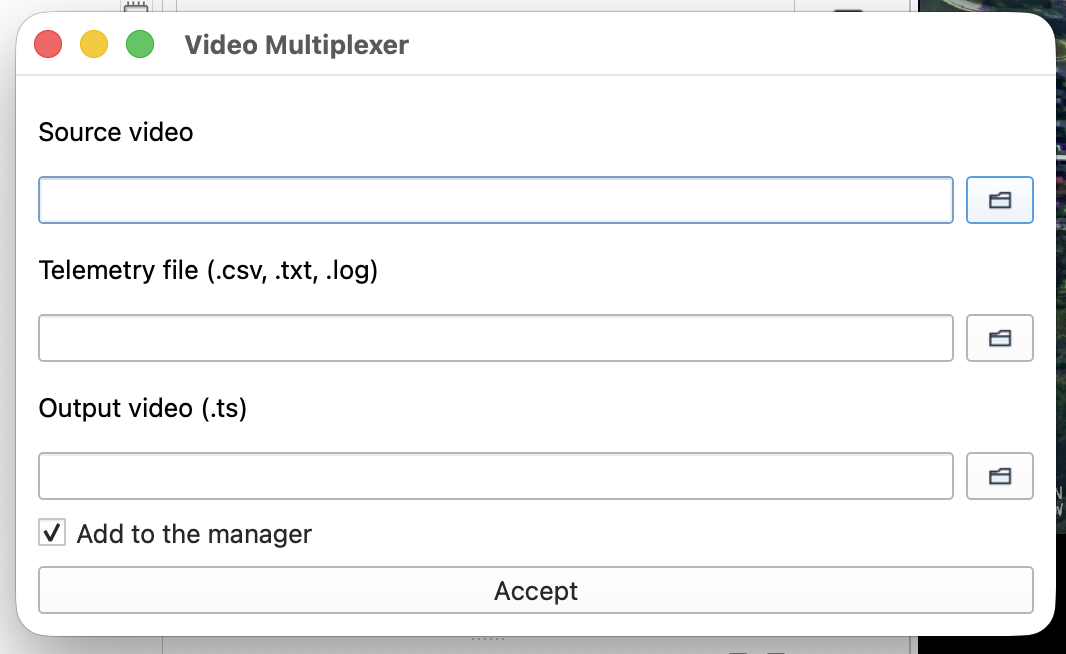
| Field | Description |
|-------|-------------|
| Source video | Original DJI (or compatible) recording |
| Telemetry | `.csv`, `.txt`, or `.log` flight log |
| Output | Destination `.ts` path |
| Add to manager | Load result when mux finishes |
### DJI telemetry sources
Flight records often live under `DJI/Dji.go.v4/FlightRecords`.
Convert to CSV if needed:
- [CsvView](https://datfile.net/CsvView/downloads.html)
- [DJI Flight Log Viewer](https://www.phantomhelp.com/logviewer/upload/)
### Steps
1. **File → Create MISB File**
2. Select video + telemetry
3. Confirm output `.ts`
4. **Accept** and wait for completion
Output has embedded KLV — no separate `klv/` folder.
---
## Video Player
Docked or floating window with video surface, timeline, and menus.
### Playback

| Control | Action |
|---------|--------|
| Play / Pause | `Ctrl+P` |
| Stop | `Ctrl+S` |
| Seek | `←` `→` or slider |
| Loop | `Ctrl+L` |
| Record clip | `Ctrl+R` |
| Volume / mute | `Ctrl+U` |
Video decodes with **OpenCV**; audio export uses **FFmpeg**.
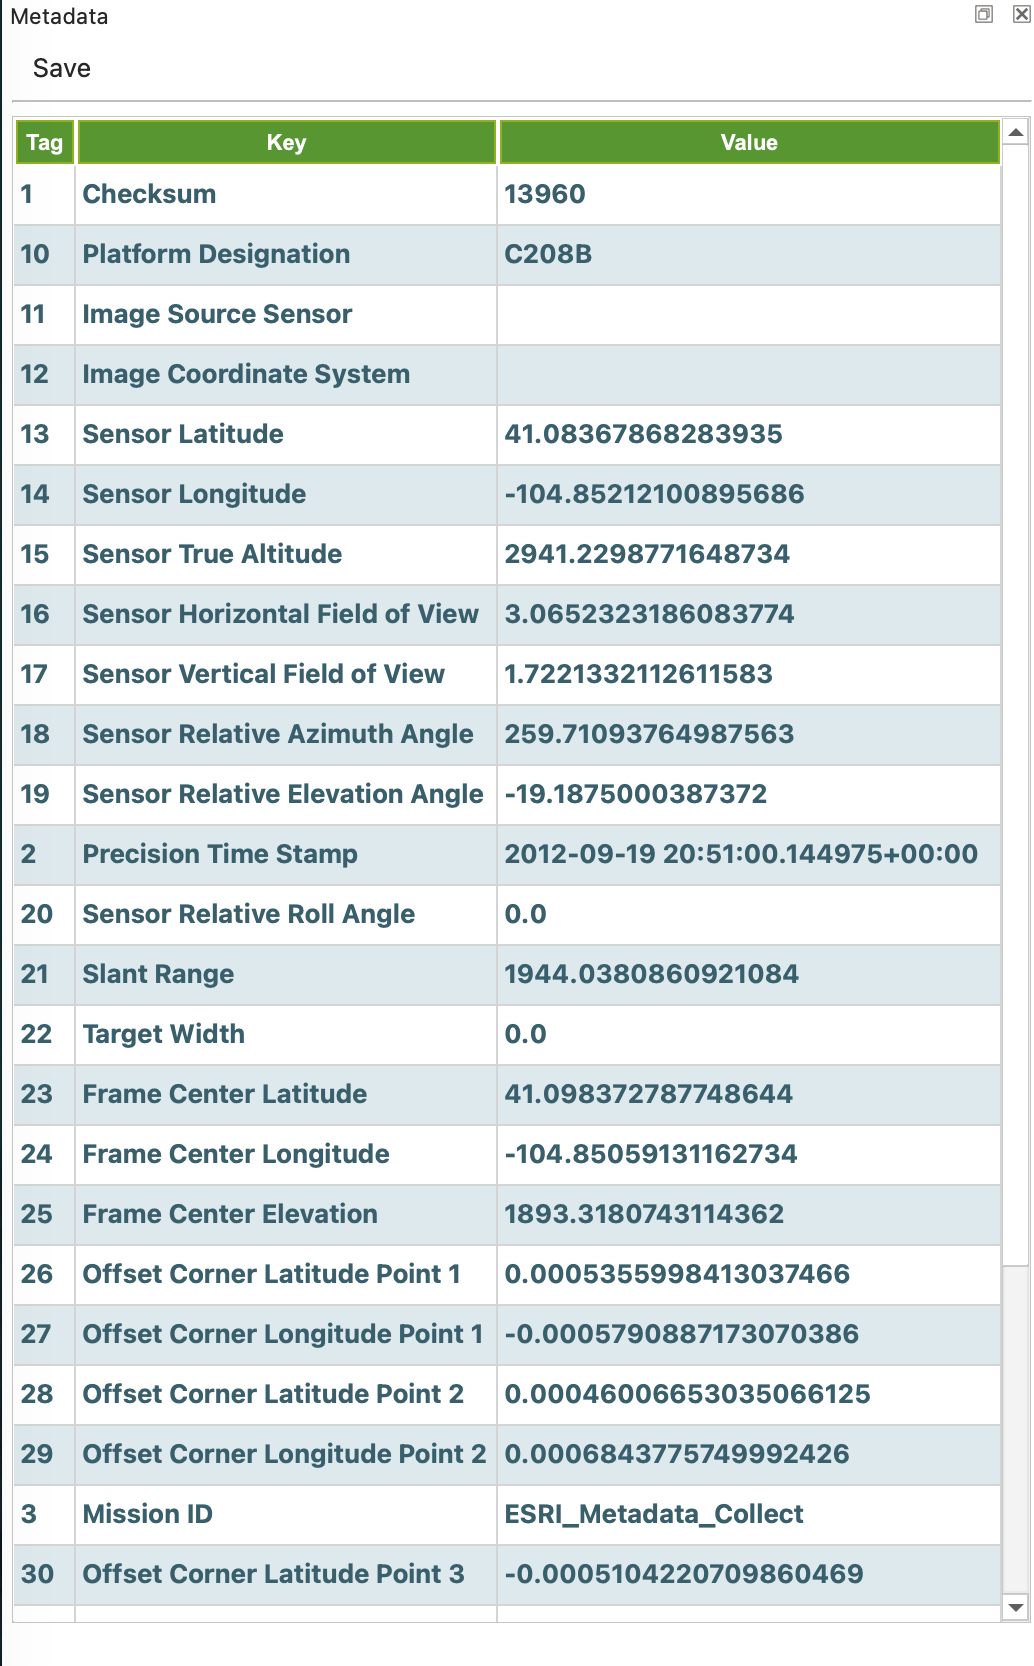
### Metadata dock
**Ctrl+T** — MISB tags for the current frame. Export **CSV** or **PDF**.
### Video menu
| Item | Description |
|------|-------------|
| Filters | Real-time enhancement, indices, motion — plus **AI Detection** submenu |
| Frames | Capture current / all / georeferenced |
| Video info | ffprobe JSON tree |
| Bitrate | Audio/video bitrate plots |
| Mosaic | Live georeferenced mosaic (`Ctrl+M` toolbar button) |
| Converter | Remux to another container |
---
## Map & layers
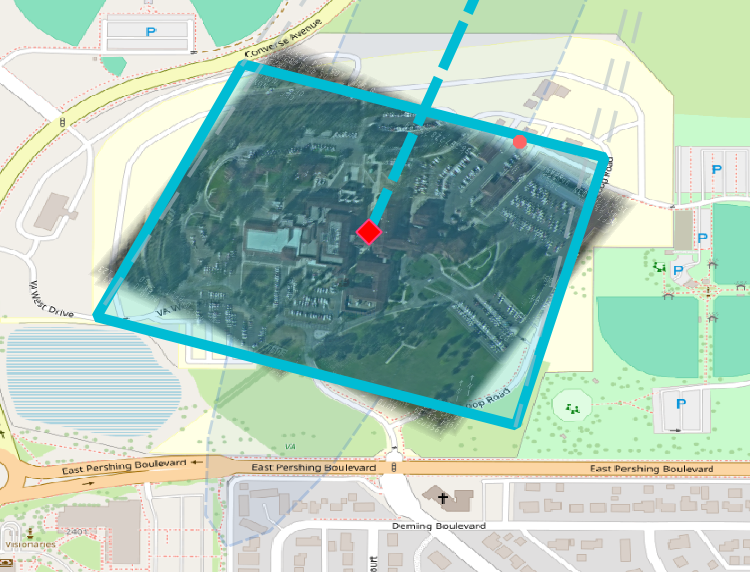
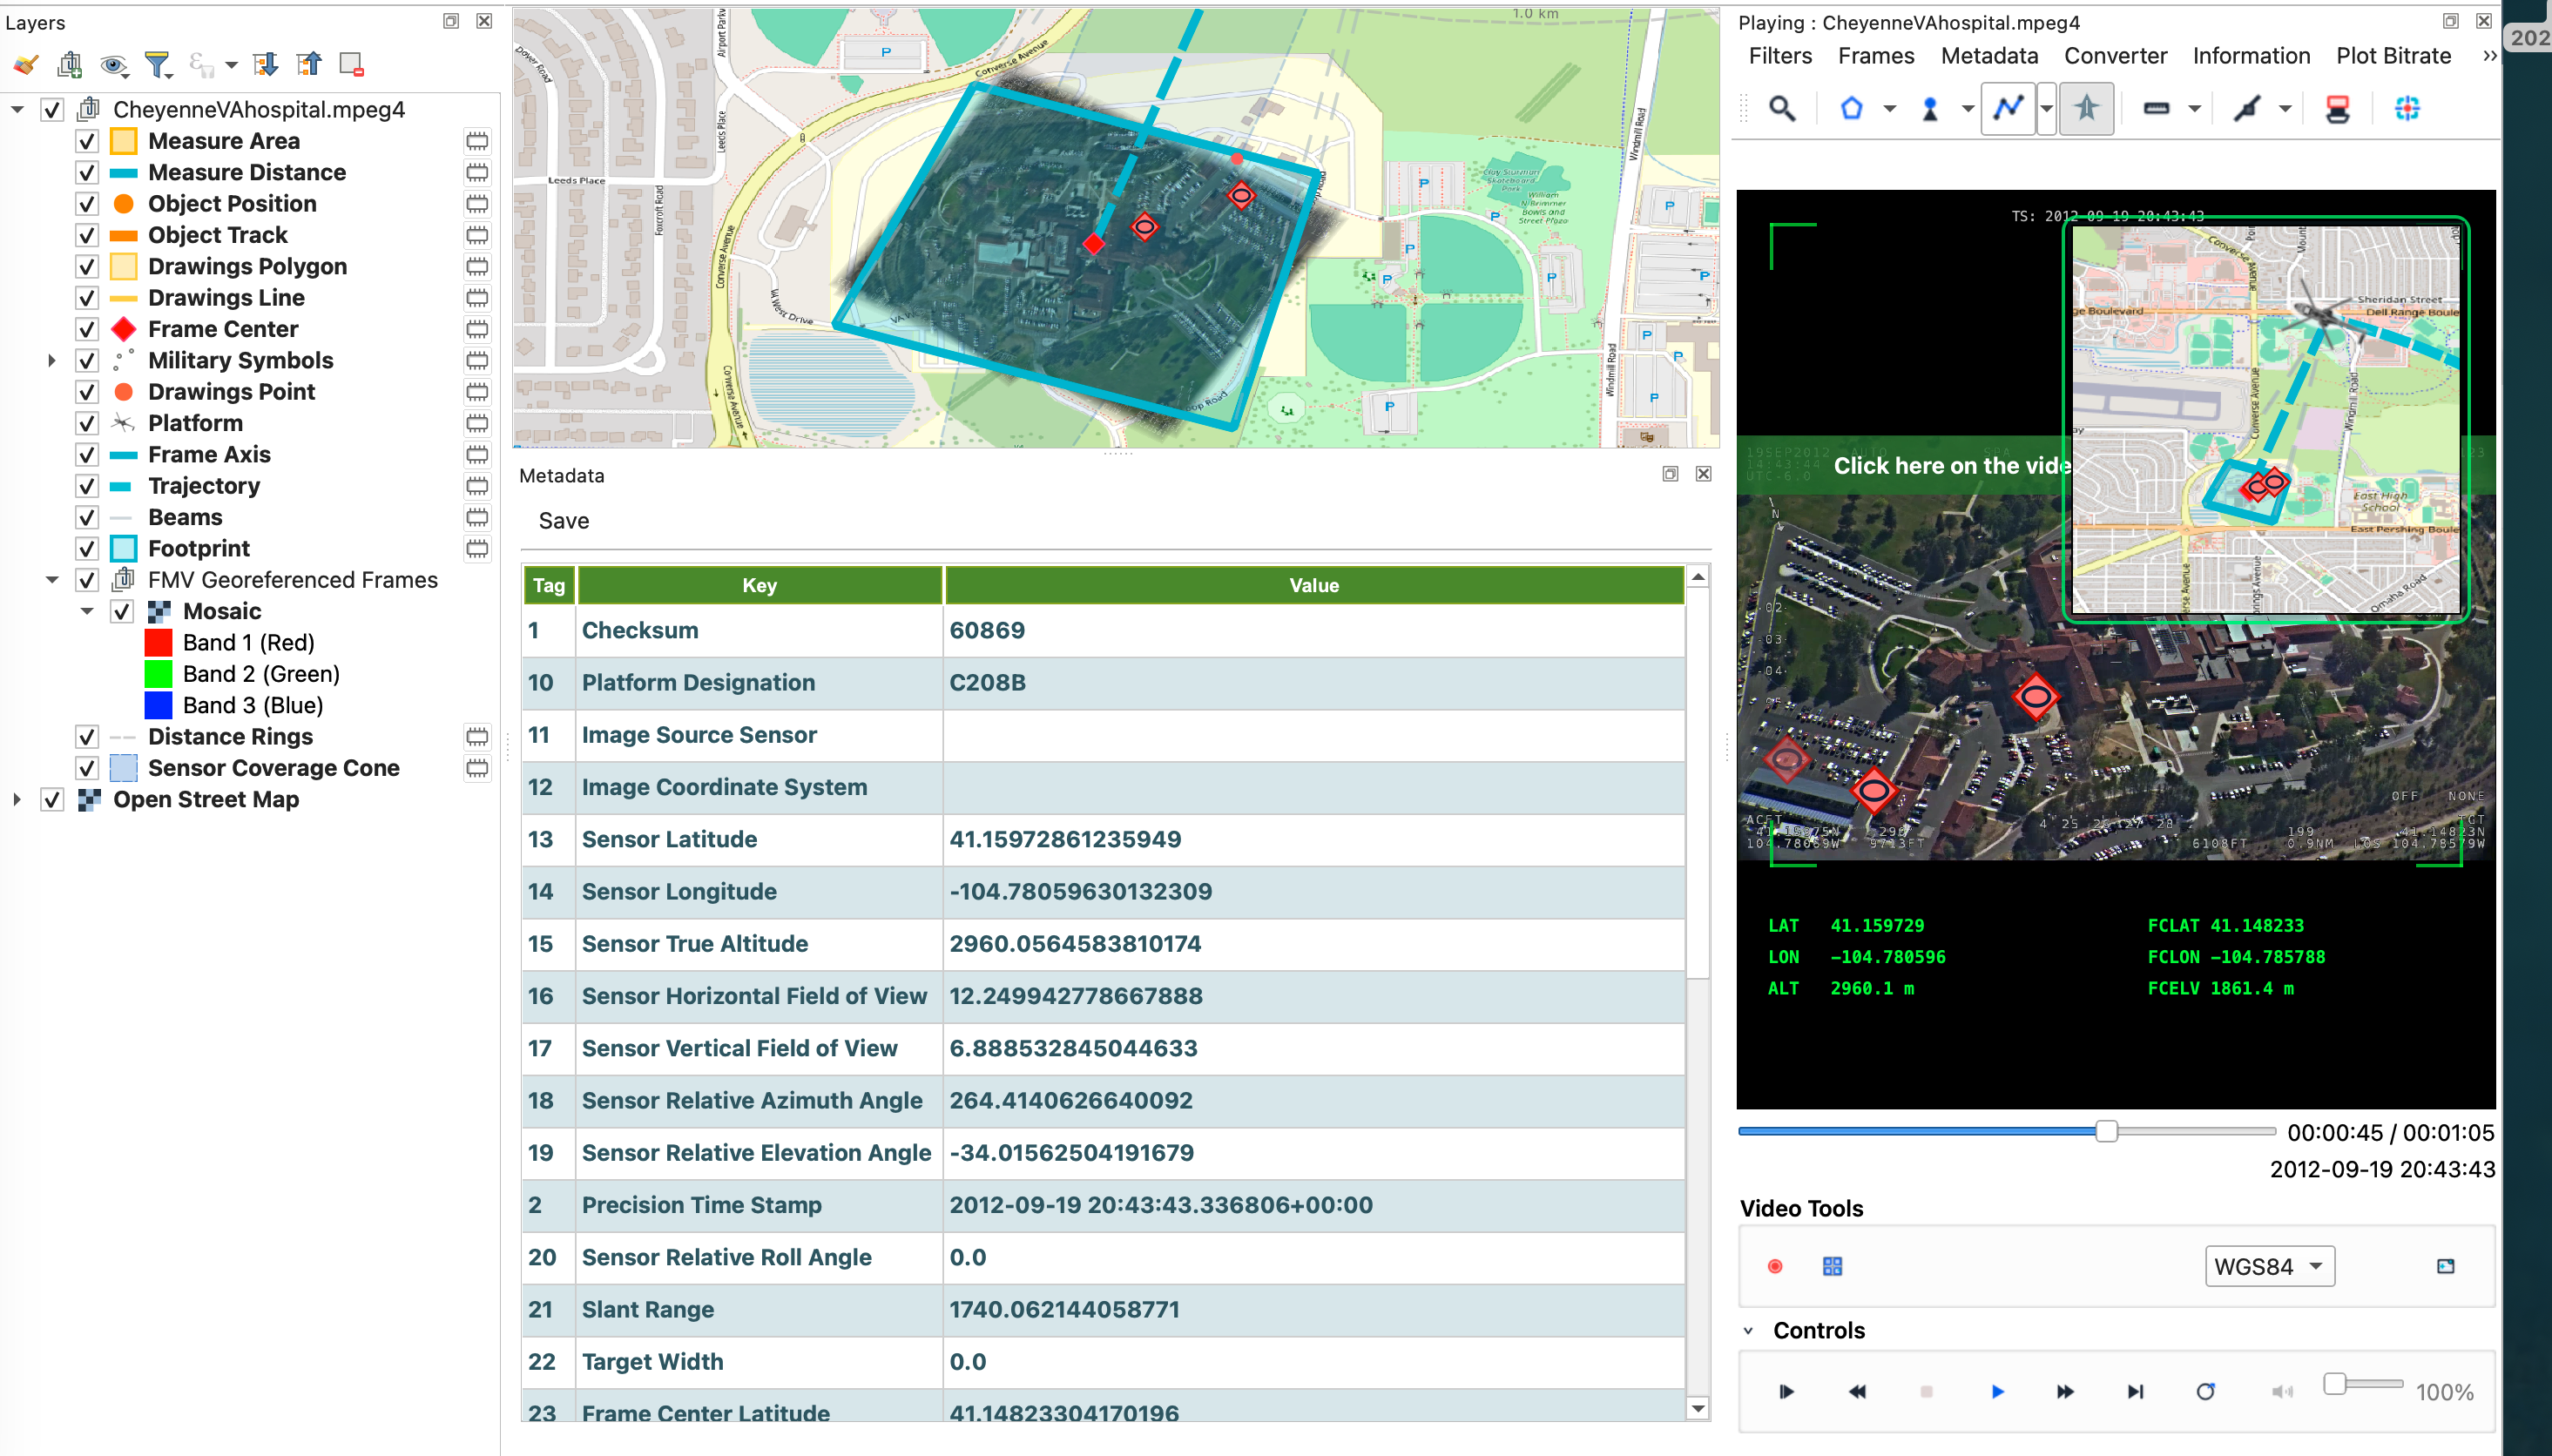
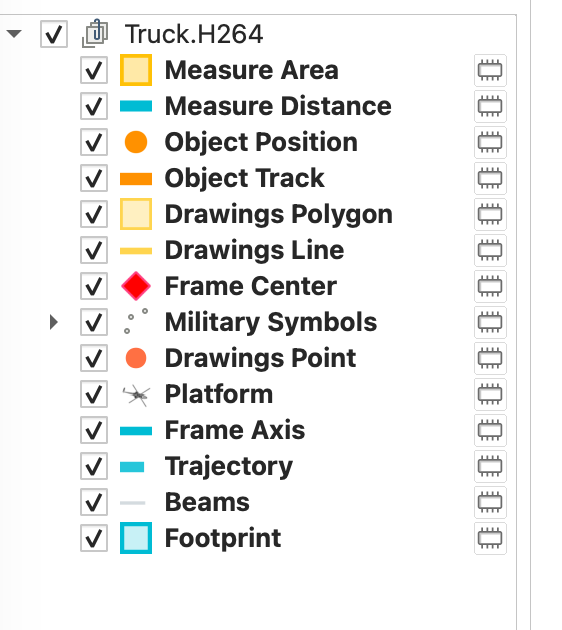
Each video gets a **layer group** with symbology driven by telemetry:
| Layer | Content |
|-------|---------|
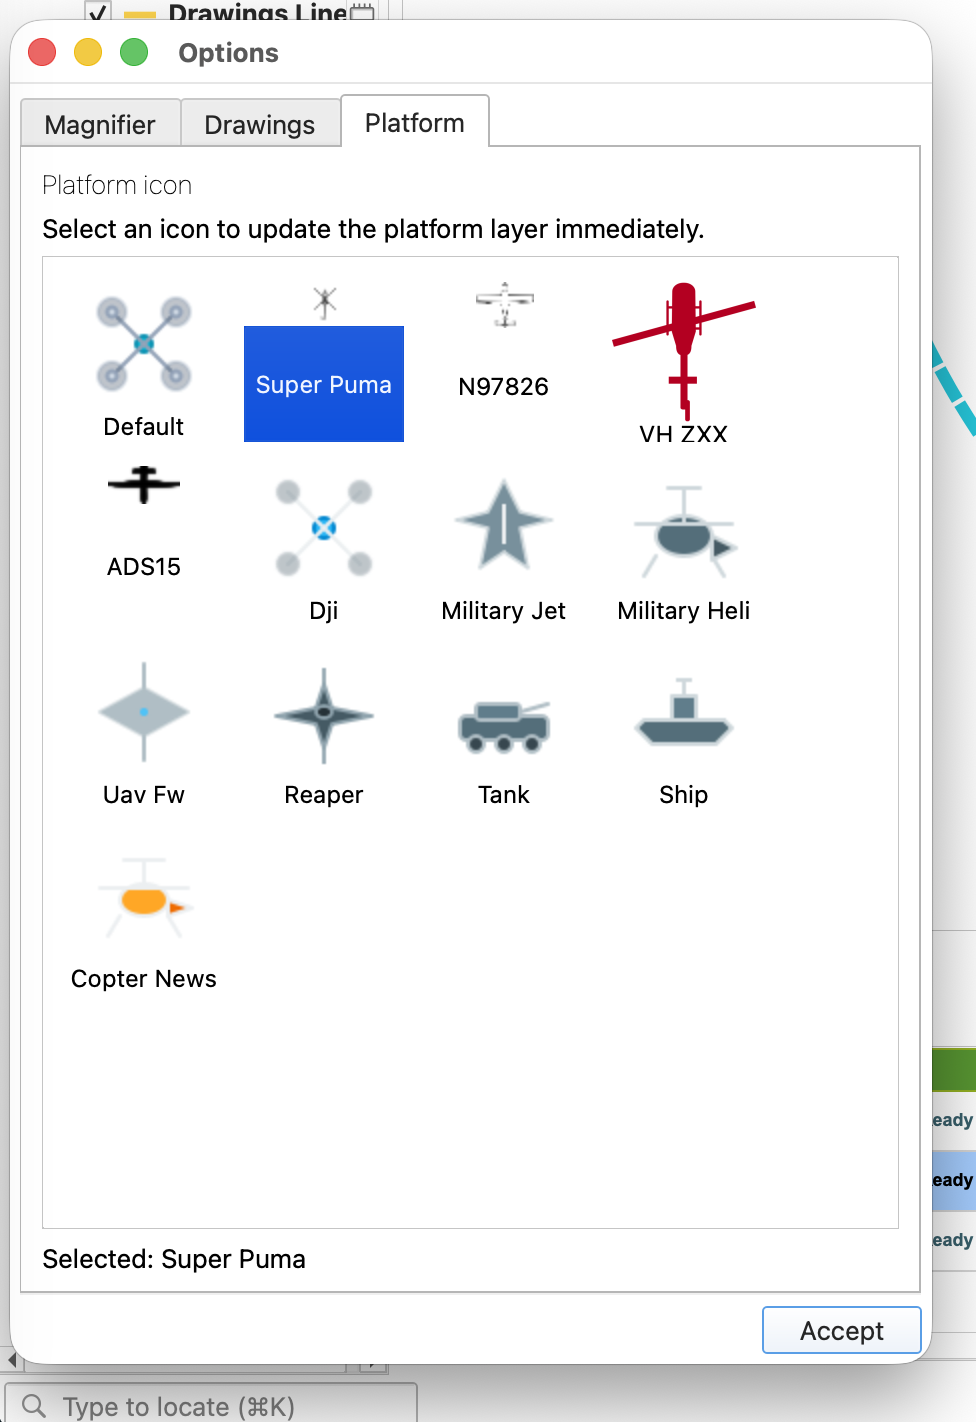
| Platform | Sensor position + heading (pick icon in **Options → Platform**) |
| Footprint | Ground footprint polygon |
| Beams | Sensor corner rays |
| Trajectory | Platform path (decimated for performance) |
| Frame Center / Axis | Target geometry |
| Drawings | User sketches on video |
| Military Symbols | APP-6D inspired symbols placed on video/map |
| Sensor Coverage Cone / Distance Rings | Optional C2 overlays from **FMV Tools** |
### Center modes
**Video → Center on Platform / Footprint / Target** — re-centers the QGIS map canvas on the active feature.
### Platform icon
**Options → Platform** tab — thumbnail picker from military, DJI, UAV, helicopter, ship, tank presets. Updates the map layer immediately.
---
## Video Filters
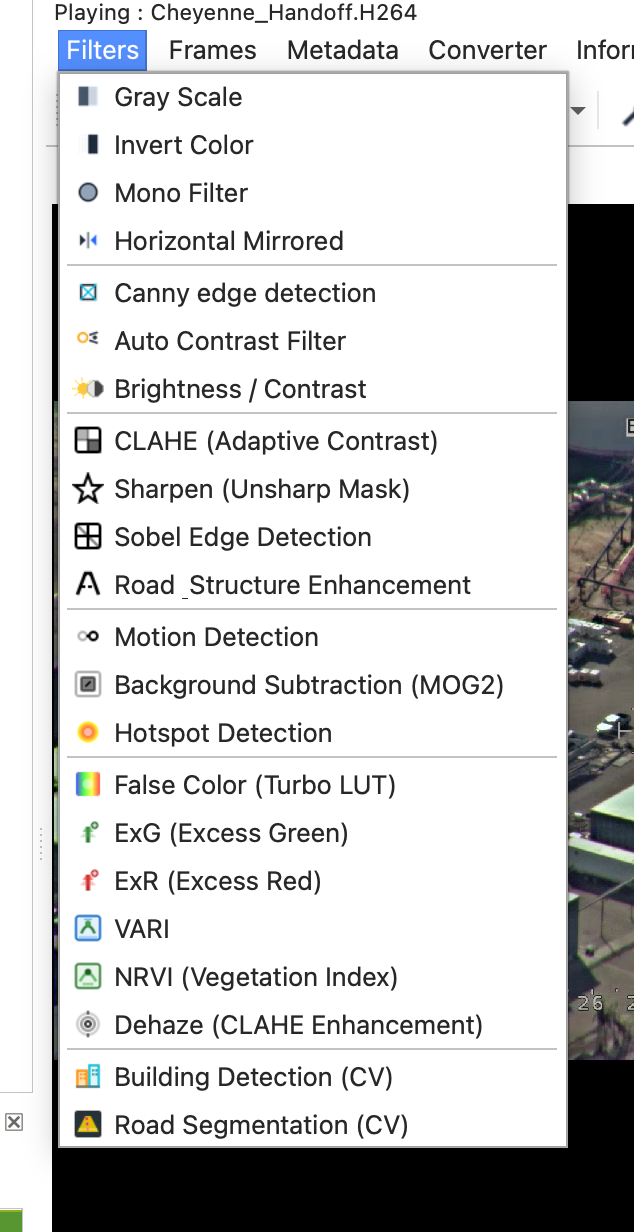
Access via **Filters** menu in the player. All filters work in real-time during playback.
### Image enhancement
| Filter | Description |
|--------|-------------|
| **CLAHE** | Adaptive histogram equalization — improves contrast in shadows, fog, dark video |
| **Sharpen** | Unsharp mask — makes buildings, vehicles, roads more visible |
| **Brightness / Contrast** | Manual adjustment with slider dialog |
| **Auto Contrast** | Automatic CLAHE-based contrast |
| **Dehaze** | CLAHE + contrast stretch for foggy or low-visibility images |
| **Road Enhancement** | CLAHE + Sobel + Sharpen combined — highlights roads and structures |
### Edge detection
| Filter | Description |
|--------|-------------|
| **Canny Edge** | Classic Canny edge detection |
| **Sobel** | Sobel gradient magnitude — highlights structural edges, buildings, lines |
### Color & vegetation
| Filter | Description |
|--------|-------------|
| **False Color (Turbo)** | Rainbow LUT — makes intensity differences easy to interpret |
| **Vegetation Index (ExG/VARI)** | Excess Green index — NDVI equivalent for RGB cameras without NIR |
### Detection & motion
| Filter | Description |
|--------|-------------|
| **Motion Detection** | Frame difference — highlights moving objects with minimal cost |
| **Background Subtraction (MOG2)** | Adaptive background model — automatically detects moving objects |
| **Hotspot Detection** | Highlights brightest pixels (thermal cameras) in red overlay |
### AI Detection (summary)
Segmentation filters for buildings, roads, vehicles, persons, fire, smoke and flood live under **Filters → AI Detection**. See [AI Detection](#ai-detection) for YOLO setup, VisDrone, and `[FILTERS]` tuning.
### Quick filters
| Filter | Description |
|--------|-------------|
| **Gray Scale** | Convert to grayscale |
| **Invert Colors** | Invert pixel values |
| **Mono** | 1-bit monochrome |
| **Mirror Horizontal** | Flip video horizontally |
> **Note:** Only one "slow" filter can be active at a time (CLAHE, Sharpen, Sobel, AI Detection, etc.). Quick filters (Gray, Invert, Mono, Mirror) can combine with any slow filter.
---
## AI Detection
Designed for **FMV and UAV aerial video**. Open **Filters → AI Detection** in the player.

### Available filters
| Menu item | Primary engine | Fallback |
|-----------|----------------|----------|
| **Vehicle (YOLO AI)** | VisDrone YOLOv8n (ONNX) | Smart CV (blob + edge + motion) |
| **Person (YOLO AI)** | VisDrone YOLOv8n (ONNX) | Smart CV (vertical shape) |
| **Building (CV + AI)** | Smart CV | Optional custom YOLO ONNX |
| **Road (CV + AI)** | Smart CV + lane hints | Optional custom YOLO ONNX |
| **Fire (CV + AI)** | HSV warm-color CV | Optional custom YOLO ONNX |
| **Smoke (CV + AI)** | Low-saturation texture CV | Optional custom YOLO ONNX |
| **Flood (CV + AI)** | Blue/cyan water band CV | Optional custom YOLO ONNX |
### On-screen overlay
Each AI filter draws:
- **Colored tint** on high-confidence regions (adaptive thresholds for aerial video)
- **Bounding boxes** with optional **#track_id** and **confidence %** on each box
- **Status banner** at the top, e.g. `VEHICLE [YOLO] det:3 12%` or `BUILDING [CV] det:2 8%`
`[YOLO]` = OpenCV DNN; `[CV]` = classical computer vision; `[SCIPY]` / `[NUMPY]` = fallback without OpenCV.
### Setup (first time)
1. **FMV Settings → AI Detection**
2. Click **Download VisDrone aerial model** (or point **ONNX path** to your own model)
3. Enable **Use YOLO/ONNX for segmentation filters**
4. Keep profile **aerial** for FMV/UAV footage
5. Open a video → **Filters → AI Detection → Vehicle (YOLO AI)**
If YOLO finds nothing on a frame, the plugin automatically falls back to tuned CV when **dnn_fallback_when_empty** is enabled (default).
### Advanced tuning (`settings.ini`)
Section **`[DNN]`** — model path, profile, confidence, NMS, class IDs.
Section **`[FILTERS]`** — aerial detection profile (defaults optimized for FMV):
| Key | Default | Effect |
|-----|---------|--------|
| `profile` | `aerial` | Enables FMV-tuned thresholds |
| `overlay_abs_threshold` | `0.10` | Lower = more visible tint |
| `detection_percentile` | `70` | CV sensitivity |
| `clahe_pregain` | `true` | CLAHE before detection (haze) |
| `multiscale_detection` | `true` | Fuse full-res + half-res scores |
| `box_nms_iou` | `0.42` | Remove duplicate CV boxes |
| `show_box_confidence` | `true` | Labels on boxes |
| `tracking_enabled` | `true` | Stable `#id` across frames |
| `dnn_fallback_when_empty` | `true` | YOLO → CV when no DNN hits |
Template with comments: **`code/settings.sample.ini`**.
### Tips for aerial FMV
- Use **aerial** profile, not **coco**, for drone footage
- Lower **onnx_confidence** to `0.12–0.15` for very small vehicles
- Vehicle/Person need VisDrone; other classes need a **custom 7-class ONNX** if you want true YOLO for fire/smoke/etc.
- On macOS, if OpenCV is blocked by code signing, filters still run on numpy/scipy fallbacks (slower, fewer boxes)
---
## FMV Tools
Menu **Tools** in the player:
| Tool | Shortcut | Description |
|------|----------|-------------|
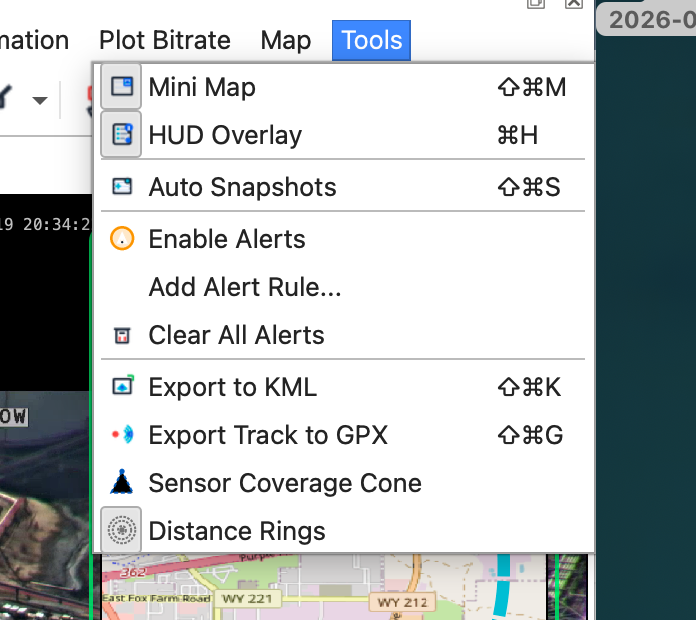
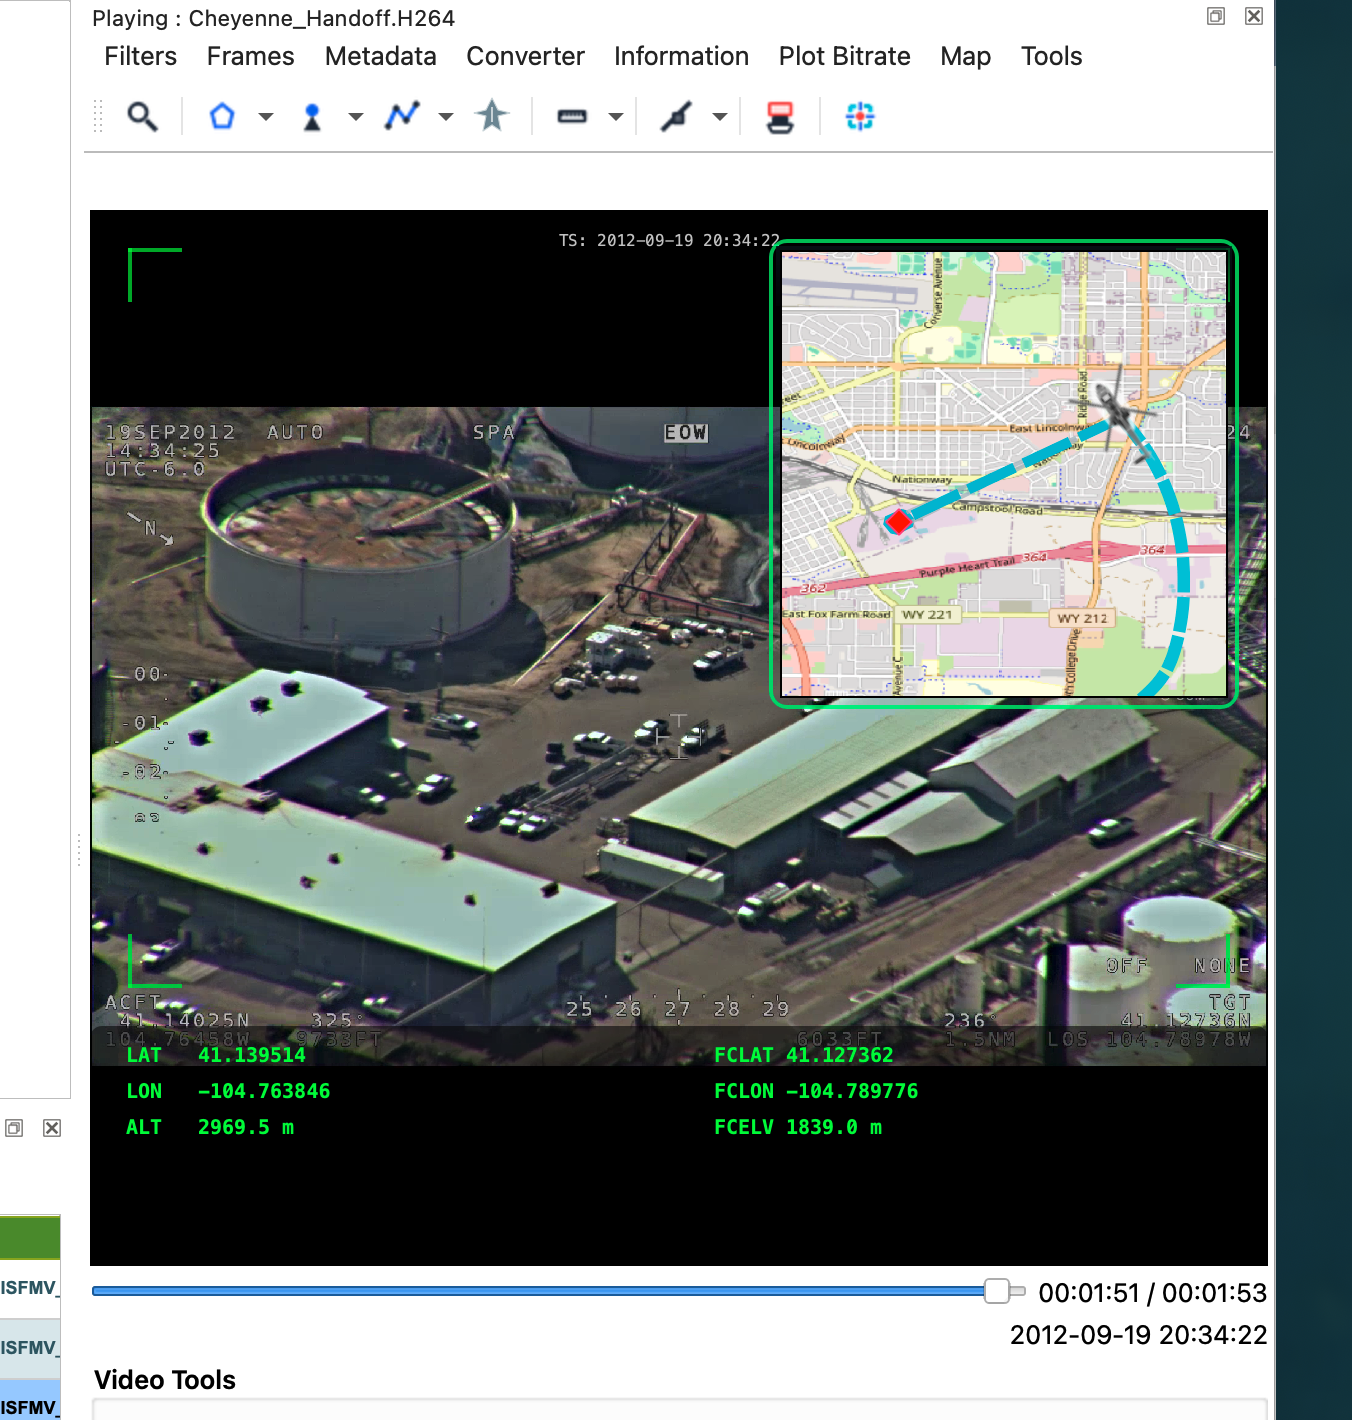
| **HUD Overlay** | `Ctrl+H` | Telemetry overlay on video (alert flash works even if HUD is off) |
| **Mini Map** | `Ctrl+Shift+M` | PiP map — trajectory, footprint, platform, heading |
| **Auto Snapshots** | `Ctrl+Shift+S` | Periodic frame capture |
| **Enable Alerts** | — | Telemetry field rules (altitude, slant range, …) |
| **Add / Clear Alert Rule** | — | Numeric thresholds on MISB fields |
| **Set Geofence from Footprint** | — | Arm spatial AOI from current FOV |
| **Clear Geofence** | — | Remove AOI |
| **Watch Detections in Geofence** | — | **Sentinel**: AI hits inside AOI → alert + bookmark + HUD banner |
| **Add Timeline Bookmark** | `B` | Marker at playhead (stores frame-center lat/lon) |
| **Clear / Export Bookmarks** | `Ctrl+Shift+B` | CSV / KML with coordinates |
| **Sensor Coverage Cone** | — | C2 cone on the map |
| **Distance Rings** | — | Range rings around the platform |
| **AI Detections on Map** | — | Publish YOLO/CV boxes as georeferenced points |
| **Detection Heat Trail** | — | Accumulate detections over time on a trail layer |
| **Live Place Labels** | `Ctrl+Shift+P` | Reverse-geocode frame center → HUD `PLACE` line |
| **Instant Replay on Alert** | `Ctrl+Shift+R` | On alert/sentinel: rewind ~3 s and pause |
| **Auto Storyboard Captures** | `Ctrl+Shift+Y` | Silent GeoTIFFs on bookmarks / alerts |
| **Export KML / GPX** | `Ctrl+Shift+K` / `Ctrl+Shift+G` | Export trajectory / layers |
| **Export Mission Package** | `Ctrl+Shift+E` | One ZIP: bookmarks, geotime, layers, mosaic, detections, geofence, storyboard |
Menu **Map**:
| Tool | Shortcut | Description |
|------|----------|-------------|
| **Center on Platform / Footprint / Target** | — | Follow modes |
| **Cinematic Map Follow** | `Ctrl+Shift+C` | Smooth (lerped) map recentering while following |
| **Click Map to Seek** | `Ctrl+Shift+J` | Click near the track → jump video |
| **Map Time Machine** | `Ctrl+Shift+T` | Hover along the track → scrub video + **ghost FOV** |
| **Lookback — What did we see here?** | `Ctrl+Shift+L` | Click a place → every time the FOV covered it |
| **Pin Target on Map** | `Ctrl+Shift+N` | Lock a cue point: range / bearing / next FOV |
| **Jump to Next Target FOV** | `Ctrl+Shift+U` | Seek to the next coverage of the pin |
| **Clear Target Pin** | — | Remove cue marker + HUD |
---
## Geo-intelligence
These tools turn FMV into a **map ↔ video time machine**. They need a video with live KLV/MISB telemetry (play a few seconds so the trajectory and footprint appear).
### Spatial timeline bookmarks
1. Play until telemetry is flowing.
2. Press **`B`** (or **Tools → Add Timeline Bookmark**).
3. Markers appear on the custom timeline; alerts and the Detection Sentinel also drop **red** markers automatically.
4. **Tools → Export Timeline Bookmarks…** → CSV or KML with `lat` / `lon` / `alt` (frame center).
KML opens in Google Earth / QGIS as real placemarks (not `0,0`).
### Geofence (spatial AOI)
1. Play until a **Footprint** is drawn on the map.
2. **Tools → Set Geofence from Footprint** — a red AOI polygon is added to the video group.
3. When the **frame center enters** the AOI → alert message + red timeline marker + HUD flash.
4. **Tools → Clear Geofence** removes the AOI.
### AOI Detection Sentinel
Combine geofence + AI:
1. Arm a geofence (above).
2. Keep **Tools → Watch Detections in Geofence** checked (default ON).
3. Keep **Tools → AI Detections on Map** checked.
4. Enable a filter under **Filters → AI Detection** (e.g. Vehicle / Person).
5. When a detection lands **inside** the AOI → `SENTINEL: 2×vehicle inside Footprint Geofence`, timeline bookmark, and a red banner on the video.
### Click Map to Seek
1. Play with telemetry so the geo/time index builds.
2. **Map → Click Map to Seek** (`Ctrl+Shift+J`).
3. Click near the trajectory / flight path → video jumps to that time.
### Map Time Machine *(wow demo)*
“Scrub the mission on the map.”
1. Play the video with KLV so the plugin records **(position, time, footprint)** samples.
2. **Map → Map Time Machine** (`Ctrl+Shift+T`).
3. Move the mouse **along the flight path** on the QGIS canvas:
- Video **seeks live** to that moment
- A translucent **ghost footprint** shows what the sensor was looking at
4. Click to lock a moment; uncheck the tool to exit.
Mutually exclusive with Click Map to Seek and Lookback.
### Lookback — “What did we see here?” *(analyst wow)*
Reverse query: pick a building, crossroads, or AOI on the map and ask *when did the sensor look at this?*
1. Play with KLV so footprints are recorded in the geo/time index.
2. **Map → Lookback — What did we see here?** (`Ctrl+Shift+L`).
3. Click a point on the map.
4. A dialog lists every clustered time the **footprint contained** that point.
5. Double-click a row (or OK) → video jumps there and the **ghost FOV** appears.
If no footprints were stored yet, Lookback falls back to times when the platform/frame-center was near the click (within ~80 m) and tells you to play longer for true FOV hits.
Mutually exclusive with Time Machine / Click-to-seek.
### Target Pin / Cue *(cross-cue wow)*
Pin any ground point and treat it as a live cue:
1. Play with KLV so the geo/time index (and footprints) build.
2. **Map → Pin Target on Map** (`Ctrl+Shift+N`) → click a building / crossroads / AOI.
3. A yellow cross appears on the map; the video shows a cue chip:
- `TGT 1.2 km / 045° / FOV@42.1s (+8.3s)` while approaching
- `TGT … / IN FOV` when the footprint covers the pin
4. When coverage **enters**, a `TARGET CUE` alert fires (bookmark / Instant Replay / Storyboard if enabled).
5. **Map → Jump to Next Target FOV** (`Ctrl+Shift+U`) seeks the next recorded visit.
6. **Map → Clear Target Pin** removes the cue.
Mutually exclusive (while arming) with Click-to-seek / Time Machine / Lookback.
### AI Detections → Map
1. **Tools → AI Detections on Map** must be ON (checkable).
2. Enable an AI filter (Vehicle, Person, Fire, …).
3. When the frame is georeferenced, box centers are projected to WGS84 and written to the **AI Detections** layer (track id, class, score).
### Detection Heat Trail
With AI publishing ON, enable **Tools → Detection Heat Trail**. Points accumulate on the **AI Detection Trail** layer (timestamped, capped) so you can see where detections occurred over the mission — not only the latest frame.
### Instant Replay on Alert
**Tools → Instant Replay on Alert** (`Ctrl+Shift+R`). When a telemetry alert, geofence enter, or Detection Sentinel fires, the player rewinds ~3 seconds and pauses (with cooldown) so you can re-watch the moment.
### Live Place Labels
**Tools → Live Place Labels** (`Ctrl+Shift+P`) + HUD on (`Ctrl+H`). The frame center is reverse-geocoded (throttled) and shown as `PLACE …` on the HUD strip.
### Auto Storyboard Captures
**Tools → Auto Storyboard Captures** (`Ctrl+Shift+Y`). On each bookmark and alert, a georeferenced GeoTIFF is written under `